Biostar K8VHA-M K8VHA M user's manual - Page 11
CPU Installation, Central Processing Unit: CPU
 |
View all Biostar K8VHA-M manuals
Add to My Manuals
Save this manual to your list of manuals |
Page 11 highlights
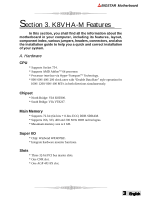
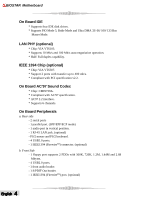
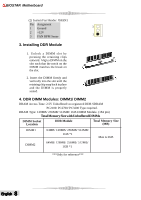
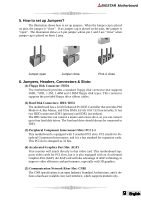
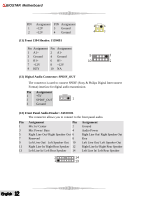
BIOSTAR Motherboard Section 5. Installation and Setup In this section, you will learn how to install the CPU, DDR Module, and also how to set up jumpers and all the information about the components on the motherboard. Not only can you find the installation steps, but also the details and locations of the components on the motherboard. 1. CPU Installation The motherboard supports AMD processor in the 754 pin package. The motherboard uses a CPU socket called PGA754 for easy CPU installation. When you are installing the CPU, make sure the CPU has a cooling fan attached on the right to prevent overheating. If you do not find the cooling fan, contact your dealer and make sure to install them before turning on the computer. Step1: Pull the lever sideways away from the socket and then raise the lever up to a 90-degree angle. Step2: Look for the white dot/cut edge. The white dot/cut edge should point towards the lever pivot. The CPU will fit only in the correct orientation. Step3: Hold the CPU down firmly, and then close the lever. Step4: Put the CPU fan on the CPU and buckle it. Connect the CPU fan power cable to the JCFAN1. This completes the installation. Step 1 Step 2 Step 3 Step 4 2 Central Processing Unit: CPU These fan headers support cooling fans built in the computer. Orient the fans to make the heat sink fins to allow air flow to go across the onboard heat sinks instead of the expansion slots. The fan wiring and plug may be different according to the fan manufacturer. Connect the fan cable to the connector while matching the black wire to the ground pin. Pin Assignment (1) CPU Fan Headers: JCFAN1 1 1 Ground 3 2 +12V 3 FAN RPM Sense 7 English
-
 1
1 -
2
-
3
-
4
-
5
-
 6
6 -
 7
7 -
 8
8 -
 9
9 -
 10
10 -
 11
11 -
 12
12 -
 13
13 -
 14
14 -
 15
15 -
 16
16 -
17
-
18
-
19
-
20
-
21
-
22
-
23
-
24
-
25
-
26
-
27
-
28
-
29
-
30
-
31
 |
 |