Biostar K8VHA-M K8VHA M user's manual - Page 28
according to the Recovery Dialog's setting.
 |
View all Biostar K8VHA-M manuals
Add to My Manuals
Save this manual to your list of manuals |
Page 28 highlights
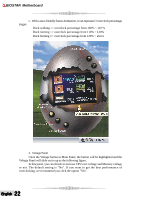
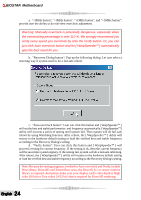
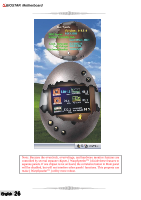
BIOSTAR Motherboard a. "-3MHz button", "-1MHz button", "+1MHz button", and "+3MHz button": provide user the ability to do real-time overclock adjustment. Warning: Manually overclock is potentially dangerous, especially when the overclocking percentage is over 110 %. We strongly recommend you verify every speed you overclock by click the Verify button. Or, you can just click Auto overclock button and let [ WarpSpeederTM ] automatically gets the best result for you. b. "Recovery Dialog button": Pop up the following dialog. Let user select a restoring way if system need to do a fail-safe reboot. c. "Auto-overclock button": User can click this button and [ WarpSpeederTM ] will set the best and stable performance and frequency automatically. [WarpSpeederTM] utility will execute a series of testing until system fail. Then system will do fail-safe reboot by using Watchdog function. After reboot, the [ WarpSpeederTM ] utility will restore to the hardware default setting or load the verified best and stable frequency according to the Recovery Dialog's setting. d. "Verify button": User can click this button and [ WarpSpeederTM ] will proceed a testing for current frequency. If the testing is ok, then the current frequency will be saved into system registry. If the testing fail, system will do a fail-safe rebooting. After reboot, the [ WarpSpeederTM ] utility will restore to the hardware default setting or load the verified best and stable frequency according to the Recovery Dialog's setting. Note: Because the testing programs, invoked in Auto-overclock and Verify, include DirectDraw, Direct3D and DirectShow tests, the DirectX 8.1 or newer runtime library is required. And please make sure your display card's color depth is High color (16 bit) or True color( 24/32 bit ) that is required for Direct3D rendering. English 24
-
 1
1 -
2
-
3
-
4
-
5
-
6
-
7
-
8
-
9
-
10
-
11
-
12
-
13
-
14
-
15
-
16
-
17
-
18
-
19
-
20
-
21
-
22
-
 23
23 -
 24
24 -
 25
25 -
 26
26 -
 27
27 -
 28
28 -
 29
29 -
 30
30 -
 31
31
 |
 |
