Bissell Easy Vac Easy Vac® User's Guide - Page 10
Cleaning the pre-motor filter, Cleaning the upper tank - replacement filters
 |
View all Bissell Easy Vac manuals
Add to My Manuals
Save this manual to your list of manuals |
Page 10 highlights
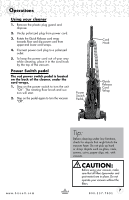
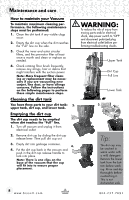
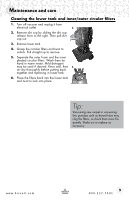
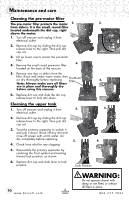
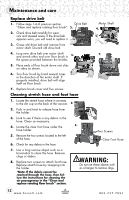
Maintenance and care Cleaning the pre-motor filter The pre-motor filter protects the motor 2. from debris. It is the small, round filter located underneath the dirt cup, right above the motor. 1. Turn off vacuum and unplug it from electrical outlet. 2. Remove dirt cup by sliding the dirt cup release lever to the right. Then pull dirt cup out. 3. Lift up lower cup to access the pre-motor filter. 4. Remove the small round pre-motor filter 4. located on the base of the vacuum. 5. Remove any dust or debris from the filter. Rinse well under warm water, then air dry thoroughly before replacing. Pre-Motor Filter Note: Always make sure all filters are in place and thoroughly dry before using this vacuum. 6. Replace dirt cup and slide the dirt cup release lever to lock into place. Cleaning the upper tank 1. Turn off vacuum and unplug it from 2. electrical outlet. 2. Remove dirt cup by sliding the dirt cup release lever to the right. Then pull dirt cup out. 3. Twist the primary separator to unlock it and pull it down. Brush off any dirt and rinse off screen with warm water. Air dry completely before replacing. 5. 4. Check hose inlet for any clogging. 5. Reassemble the primary separator by centering the front symbol and twisting toward lock position, as shown. 6. Replace dirt cup and slide lever to lock position. Lock Position 3. 6. 3. 6. 10 www.bissell.com WARNING: Do not operate cleaner with damp or wet filters or without all filters in place. 800.237.7691
-
 1
1 -
2
-
3
-
4
-
 5
5 -
 6
6 -
 7
7 -
 8
8 -
 9
9 -
 10
10 -
 11
11 -
 12
12 -
 13
13 -
 14
14 -
 15
15 -
16
 |
 |