Bissell Easy Vac Easy Vac® User's Guide - Page 5
Warning - power brush vacuum
 |
View all Bissell Easy Vac manuals
Add to My Manuals
Save this manual to your list of manuals |
Page 5 highlights
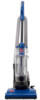
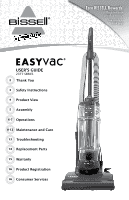
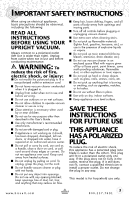
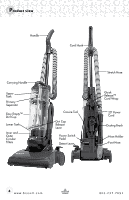
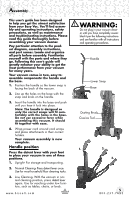
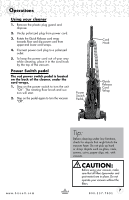
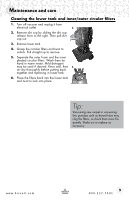
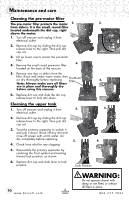
Assembly This user's guide has been designed to help you get the utmost satisfaction from your Easy Vac. You'll find assembly and operating instructions, safety precautions, as well as maintenance and troubleshooting instructions. Please read this guide thoroughly before assembling your vacuum cleaner. Pay particular attention to the product diagram, assembly instructions, and part names. Locate and organize all parts before assembly. Familiarize yourself with the parts and where they go. Following this user's guide will greatly enhance your ability to get the most performance from your vacuum for many years. Your vacuum comes in two, easy-toassemble components: the handle and the base. 1. Position the handle so the lower snap is facing the back of the vacuum. 2. Line up the holes on the base with the snap and knob on the handle. 3. Insert the handle into the base and push until you hear it lock into place. Note: The handle is designed so only the correct snaps will fit comfortably with the holes in the base. Do not use excessive force while assembling this vacuum. It should fit together with ease. 4. Wrap power cord around cord wraps and place attachments in their correct holders. Your vacuum assembly is now complete. Handle position Press the detent lever with your foot to place your vacuum in one of three positions. 1. Upright- For storage and transporting. 2. Normal Cleaning- Press detent lever once. Use for most household floor cleaning tasks. 3. Low Cleaning- With the vacuum in normal cleaning position, press detent lever again. Use for reaching under low furniture, such as tables, chairs, or beds. www.bissell.com Warning: Do not plug in your vacuum cleaner until you have completely assembled it per the following instructions and are familiar with all instructions and operating procedures. Handle Lower Snap Base Dusting Brush Crevice Tool 1. 2. 3. 5 800.237.7691
-
 1
1 -
 2
2 -
 3
3 -
 4
4 -
 5
5 -
 6
6 -
 7
7 -
 8
8 -
 9
9 -
 10
10 -
 11
11 -
12
-
13
-
14
-
15
-
16
 |
 |