Black & Decker BDH2000PL Type 1 Manual - BDH2000PL - Page 5
Warning - bowl
 |
View all Black & Decker BDH2000PL manuals
Add to My Manuals
Save this manual to your list of manuals |
Page 5 highlights
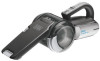
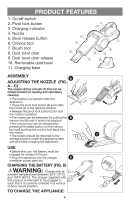
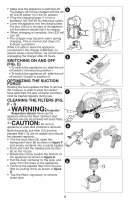
• Make sure the appliance is switched off. The battery will not be charged with the on/ D off On/Off switch (1) in the On position. • Plug the charging base (11) into a standard 120 Volt 60 Hz electrical outlet. • Lower the appliance onto the charging base. The blue LED (3) in the base of the appliance will illuminate to indicate that it is charging. • When charging is complete, the LED will turn off. • The charger may become warm during charging. This is normal and does not indicate a problem. While it is safe to leave the appliance connected to the charger indefinitely, to reduce power consumption, we recommend unplugging the charger after 24 hours. E Switching on and off (fig. E) • To switch the appliance on, slide the on/ off switch (1) forward to position I. • To switch the appliance off, slide the on/ off switch (1) back to position 0. Optimizing the suction force Rotating the bowl agitates the filter to remove dirt; however, in order to keep the suction force optimized, the dust container and filters F must be cleaned regularly during use. Cleaning the filters (fig. F - I) WARNING:Projectile/ Respiratory Hazard: Never use the appliance without the filters. Optimum dust 12 collection will only be achieved with clean filters. CAUTION: Do not turn appliance on when dust container is removed. G Both the plastic pre-filter (12) and the pleated filter (13) are re-usable and should be cleaned regularly. • Pull the door latch (9), open the transparent door (8) as shown in figure F and empty contents into a waste basket. • Push and hold the release bowl button (5) on the nozzle. • Rotate the nozzle toward the bottom of the appliance as shown in figure G. • Pull the dust container to the side, and away from the base of the appliance. H • Remove the pleated filter from the pre- filter by pulling firmly as shown in figure H. • Tap the filters vigorously to remove loose dust. 5
-
 1
1 -
 2
2 -
 3
3 -
 4
4 -
 5
5 -
 6
6 -
 7
7 -
 8
8 -
 9
9 -
 10
10 -
 11
11 -
12
-
13
-
14
-
15
-
16
-
17
-
18
-
19
-
20
-
21
-
22
-
23
-
24
-
25
-
26
-
27
-
28
 |
 |
