Black & Decker BDH2020FLFH Instruction Manual - Page 5
Operation - parts
 |
View all Black & Decker BDH2020FLFH manuals
Add to My Manuals
Save this manual to your list of manuals |
Page 5 highlights
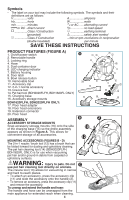
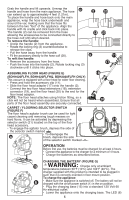
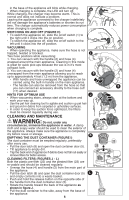
Grab the handle and lift upwards. Unwrap the handle and hose from the main appliance. The hose D can extend up to approximately 4 feet (1.21m). To place the handle and hose back onto the main appliance, wrap the hose back underneath and around the vac making sure that the hose fits between the two "feet" of the appliance. Align the handle with its cradle and click back into place. The handle (2) can be removed from the hose allowing the accessories to be connected directly to the hose cuff (20) when desired. To remove the handle: • Unclip the handle (2) from the appliance. • Rotate the locking ring (3) counterclockwise to release the clips. • Pull the hose away from the handle. • Fit the accessory directly to the hose cuff (20). To refit the handle: • Remove the accessory from the hose. • Push the hose into the handle (2). Rotate locking ring (3) clockwise until it clicks into place. 2 13 E 20 20 11 17 Assembling floor head (figure E) (BDH1620FLFH, BDH1620FLFHQ, BDH2020FLFH ONLY) This vacuum is equipped with a floor head for wider floor cleaning. • Press and hold the accessory clip (11). • Slide the floor head adapter (17) onto the handle (2). • Connect the two floor head extensions (18), extension connector (19), and the floor head (20) to the end for the floor head adaptor. NOTE: The floor head attaches using friction fitting, so a click will not be heard when assembled. Ensure that all parts of the floor head assembly are securely connected. Carpet / flooring selector switch (figure F) F The floor head's agitator brush can be used for light carpet cleaning and removing tough messes on hard floors. It can be activated by depressing the selector switch (21) located on the top of the floor head accessory. • To engage the agitator brush, depress the side of the selector switch marked . • To disengage the G brush, depress the side of the selector switch marked . 18 19 20 21 Operation Before first use, the batteries must be charged for at least 4 hours. • Connect the appliance to the charger for a minimum of 4 hours. • Charge the batteries as described below. Charging the battery (figure G) 15 WARNING: Charge only at ambient temperatures between 50°F (10°C) and 104°F (40°C). The charger supplied with this product is intended to be plugged in such that it is correctly oriented in floor mount position. To charge the appliance: 6 • Make sure the appliance is switched off. The battery will not be charged with the on/off power switch (1) in the on position. • Plug the charging base (15) into a standard 120 Volt 60 Hz electrical outlet. • Lower the appliance onto the charging base. The LED (6) 5
-
 1
1 -
 2
2 -
 3
3 -
 4
4 -
 5
5 -
 6
6 -
 7
7 -
 8
8 -
 9
9 -
 10
10 -
 11
11 -
12
-
13
-
14
-
15
-
16
-
17
-
18
-
19
-
20
-
21
-
22
-
23
-
24
-
25
-
26
-
27
-
28
 |
 |
