Black & Decker CTO7100B User Manual - Page 6
Care and Cleaning - parts
 |
View all Black & Decker CTO7100B manuals
Add to My Manuals
Save this manual to your list of manuals |
Page 6 highlights
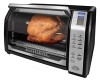
Note: You must set the toast shade selector knob as desired for the oven to begin toasting (K). 7. For best results, on first toasting cycle set the toast selector knob to medium which will be midway between light and dark setting, then re-adjust for next cycle to lighter or darker to suit your preference. 8. The ON indicator light comes on and remains on until toasting K cycle is complete. 9. When toast cycle is complete, there will be an audible signal. The oven and the on indicator light will go off. 10. Open the oven door. Using oven mitts or pot holders, slide the rack out to remove the toast. Note: This oven gets hot. When in use, always use oven mitts or potholders when touching any outer or inner surface of the oven. 11. Unplug appliance when not in use. TOAST TIPS • You must turn the toast shade selector knob to OFF to discontinue toasting. • When repeating the toast cycle immediately, it is suggested that the toast shade selector knob be set to a slightly lighter setting. KEEP WARM 1. Turn temperature selector knob to 150° F to 200° F. 2. Turn cooking function selector knob to KEEP WARM. 3. Turn time selector knob to 10 and then turn back to desired warming time, including preheat time. (Select STAY ON to control cooking time yourself. Be sure to use a kitchen timer.) Note: This feature is designed to keep already cooked foods warm after they have been cooked. This function should be used for short periods of time; to prevent food from drying out cover with foil. 4. When cycle is complete, there will be an audible signal. The oven and the on indicator light will go off. 5. If not using the oven timer, turn the oven to Off once cycle is complete. 6. Unplug appliance when not in use. 10 Care and Cleaning This product contains no user serviceable parts. Refer service to qualified service personnel. CLEANING YOUR OVEN Important: Before cleaning any part, be sure the oven is off, unplugged and has cooled completely. Always dry parts thoroughly before using oven after cleaning. 1. Clean the glass door with a sponge, soft cloth or nylon pad and sudsy water. Do not use a spray glass cleaner. 2. To remove the slide rack, open the door, pull the rack out. Wash the slide rack in sudsy water or in the dishwasher. To remove stubborn spots, use a polyester or nylon pad. 3. It is not recommended to wash bake pan/drip tray in the dishwasher. Wash the bake pan/drip tray and broil rack in sudsy water. To minimize scratching, use a polyester or nylon pad. Crumb Tray Note: The oven door must be closed to remove crumb tray. 1. Grasp the handle below the oven glass door and pull out the tray (L). 2. Dispose of crumbs and wipe the tray with a dampened cloth. 3. Be sure to dry thoroughly before inserting the tray back into the oven. L Cleaning Inside of Oven 1. Heat oven to 200° F. 2. Turn toaster oven off. 3. Place shallow glass bowl containing ½ cup ammonia on rack. 4. Close oven door and let stand overnight. 5. Next day, open oven, remove bowl and wipe interior of oven with moist paper towels. Helpful Tip To refresh air inside oven, lay strips of orange or lemon peel on rack. Heat toaster oven to 350° F and bake for 30 minutes. Turn oven off and let stand until oven is completely cool. Remove peel. Exterior Surfaces Important: The oven top and side surfaces get hot. Make sure the oven has cooled completely before cleaning. Wipe the top and exterior walls with a damp cloth or sponge. Dry thoroughly. Cooking Containers Metal, ovenproof glass or ceramic bakeware without glass lids can be used in your oven. Follow manufacturer's instructions. Be sure the top edge of the container is at least 1½" (3.81 cm) away from the upper heating elements. 11 ENGLISH
-
 1
1 -
 2
2 -
 3
3 -
 4
4 -
 5
5 -
 6
6 -
 7
7 -
 8
8 -
 9
9 -
 10
10 -
 11
11 -
 12
12 -
13
-
14
-
15
-
16
-
17
-
18
-
19
 |
 |
