Black & Decker FHV1200 Type 1 Manual - FHV1200 - Page 4
Assembly - charger
 |
View all Black & Decker FHV1200 manuals
Add to My Manuals
Save this manual to your list of manuals |
Page 4 highlights
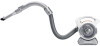
This product can accept any of the following chargers listed below. Model UA180020B or Model UA160015a Assembly A 2 Mounting accessories (figures A & B) The 2-in-1 nozzle / brush tool (14) has a brush that can be folded forward for dusting and upholstery cleaning. 10 The pet hair cleaning tool (13) is for use when vacuuming pet hair and/or ground-in debris from carpeted or upholstery surfaces. WARNING: Injury to pets. Do not use pet hair cleaning tool 11 directly on animals. The crevice tool (11) allows for vacuuming in narrow and hard to-reach places. • To attach an accessory (11), press the accessory clip (10) and slide the accessory onto the handle (2). • To remove an accessory, press the accessory clip (10) and remove the accessory. To unwrap and extend the handle and hose: B The handle and hose can be unwrapped from the main appliance for extended reach when cleaning. Grab the handle where the arrows indicate and lift upwards. Unwrap the handle and hose from the main appliance. The hose can extend up to approximately 4 feet (1.21m). To place the handle and hose back onto the main appliance, wrap the hose back underneath and around the vac making sure that the hose fits between the two "feet" of the appliance. Align the handle with its cradle and click back into place. The handle (2) can be removed from the hose allowing the accessories to be connected directly to the hose cuff (16) when desired. To remove the handle: • Unclip the handle (2) from the appliance. • Rotate the locking ring (3) counterclockwise to release the clips. C • Pull the hose away from the handle (2). • Fit the accessory directly to the hose cuff (16). To refit the handle: • Remove the accessory from the hose. • Push the hose into the handle (2). Rotate locking ring (3) clockwise until it clicks into place. Fitting the accessory caddy (figure C) 2 16 11 16 12 When not in use, accessories can be stored in the accessory caddy (12). The accessory caddy can be removed if necessary. • To install the accessory caddy (12) push it onto the lugs on the body of the appliance until it clicks into place. NOTE: Caddy only fits on one side of the appliance. • To remove the accessory caddy (12) grasp either of the rounded sides and pull it away from the base of the appliance. 4
-
 1
1 -
 2
2 -
 3
3 -
 4
4 -
 5
5 -
 6
6 -
 7
7 -
 8
8 -
 9
9 -
 10
10 -
11
-
12
-
13
-
14
-
15
-
16
-
17
-
18
-
19
-
20
-
21
-
22
-
23
-
24
-
25
-
26
-
27
-
28
 |
 |
