Black & Decker HSVJ520JMBF27 Instruction Manual - Page 4
Assembly, Charging the battery - parts
 |
View all Black & Decker HSVJ520JMBF27 manuals
Add to My Manuals
Save this manual to your list of manuals |
Page 4 highlights
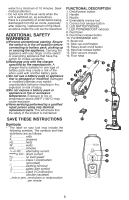
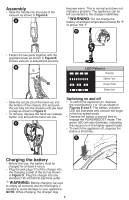
Assembly • Slide the handle into the base of the vacuum as shown in Figure A. A become warm. This is normal and does not indicate a problem. The appliance can be left connected to the charger indefinitely. WARNING: Do not charge the battery at ambient temperatures below 50 °F or above 104 °F. D • Fasten the two parts together with the supplied screw as shown in Figure B. Ensure vacuum is assembled securely. B • Slide the nozzle (3) of the hand vac into the bottom of the chassis (15) and push the vac fully into the chassis until you hear a snap as shown in Figure C. • To remove, depress the hand vac release button (14) and pull the hand vac out. C Switching on and off • To switch the appliance on, depress the on/off button (1 or 12) as shown in Figures E and F. The battery indicator LED will illuminate and vacuum will begin in the low-speed mode. • Depress the button a second time to engage the POWERBOOST mode. The green LED will also illuminate, indicating the vacuum is in the higher-speed mode. • To switch the appliance off, depress the button a third time. E Charging the battery • Before first use, the battery must be charged for at least 4 hours. • Plug the jack plug (17) of the charger into the charging socket of the tool as shown in Figure D. Plug the charger into any standard 120 Volt 60 Hz electrical outlet. WARNING: Before charging, be sure to empty all contents and dry thoroughly if needed to avoid damage to your appliance. NOTE: While charging, the charger may 4
-
 1
1 -
 2
2 -
 3
3 -
 4
4 -
 5
5 -
 6
6 -
 7
7 -
 8
8 -
 9
9 -
 10
10 -
11
-
12
-
13
-
14
-
15
-
16
-
17
-
18
-
19
-
20
-
21
-
22
-
23
-
24
-
25
-
26
-
27
-
28
 |
 |
