Black & Decker VEC1089ABD Type 1 Manual - %DocumentPath%\English\Instruction M - Page 6
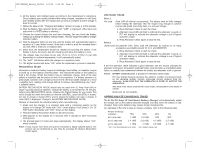
Approxima, Te Charging Times - smart battery charger
 |
View all Black & Decker VEC1089ABD manuals
Add to My Manuals
Save this manual to your list of manuals |
Page 6 highlights
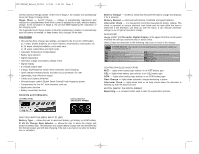
VEC1089ABD_Manual_042805 5/9/05 2:40 PM Page 6 6. Fill the battery with distilled water according to the manufacturer's instructions. Since batteries may rapidly bubble while being charged, remember to refill (only with distilled water) after the equalization process is complete and the voltage is back to normal. 7. Follow the steps in the "Charging the Battery" section on page 4 of this manual. 8. Push the Battery Type Selector Switch until "WET" is displayed. (This mode will only work if a WET battery is selected.) 9. Choose the correct charge rate and start charging. You can check the battery voltage by pushing the Battery Voltage button. This will trigger the Battery Voltage indicator button. 10. Push the Equalize button at any time and the battery will automatically begin to equalize in 2 amp limited current. Note that in order to push the recessed button you will need a small pin or ballpoint pen. 11. Every hour, the temperature should be checked by touching the battery. If the battery is hot to the touch, stop the charging and allow the battery to cool. 12. The voltage rises, but does not go over 15.3v to 16.2v (2.55-2.7v per cell) depending on ambient temperature, it will automatically adjust. 13. The "WET" LED flashes while the charger is in equalize mode. 14. The digital readout will show "FUL" when the equalization process is complete. Recondition Mode Whenever a lead-acid battery begins to discharge, lead sulfate, an insulator, begins to build up on the battery's internal plates. This reduces the ability of the battery to hold a full charge. When that battery has an immediate charge, most of the lead sulfate is dissolved and the plates are free of this insulation. If a battery remains in a discharged condition over a longer period of time, the lead sulfate changes to a hard crystalline form, making a full charge difficult to achieve. Reconditioning may "save" a sulfated battery. BATTERY RECONDITION MODE should only be used with 10 Amp Hour (Ah) or larger capacity lead-acid batteries. Charge the battery to be treated for 20 minutes, before using RECONDITION Mode. Observe the Digital Display for any codes. This initial charge will check the battery for shorted cells (F01), open cells (F03) or battery too low to accept a charge (F02), and to ensure the battery can take a charge. If code (F03) is displayed, change to the BATTERY RECONDITION MODE. Remove or disconnect the vehicle's battery when reconditioning. 1. Make sure the charger is in initiation state with a circulating pattern on the display or in charge OFF mode with "000" on the display. If not, press 2/10/15 AMP button repeatedly until "000" shows on the display. 2. Press the Battery Recondition button to start the process. 3. DES appears on the display for 3 seconds, then it changes to three horizontal moving bars. 4. The process takes 24 hours and stops automatically. The display shows "000" when complete. Note: It may require more than one cycle to recondition a highly sulfated battery. The process can be terminated at any time by pressing the Battery Recondition button again. 6 Alternator Check Part 1 No Load (Turn OFF all vehicle's accessories): The battery must be fully charged before testing the alternator. Run the engine long enough to achieve normal idle speed and verify there is a no-load voltage. 1. Press Alternator Check to start the check. 2. Alternator Good LED will light to indicate the alternator is good, or F07 will display to indicate the alternator voltage is out of typical operation range. 3. Press Alternator Check again to stop the test. Part 2 Under Load (Accessories ON): Next, load the alternator by turning on as many accessories as possible (except for A/C and DEFROST) 1. Press Alternator Check to start the check. 2. Alternator Good LED will light to indicate the alternator is good, or F07 will display to indicate the alternator voltage is out of typical operation range. 3. Press Alternator Check again to stop the test. If the first alternator check indicates a good alternator and the second indicates the alternator is not good, the problem could stem from: loose fan belts, an intermittent diode failure or possibly bad connections between the battery and alternator and/or ground. Notes: BATTERY VOLTAGE button is disabled in Alternator Check mode. F07 may display because someone has added a number of accessory loads on the charging system, thereby increasing current demand from the alternator. MAKE SURE THAT THE ALTERNATOR IS RATED TO SUPPORT THE APPLICATION. This check may not be accurate for every make, manufacturer and model of vehicle. Check only 12 volt systems. APPROXIMATE CHARGING TIMES The 2/10/15 Amp 12 Volt Smart Battery Charger will automatically adjust the charge rate as the battery becomes charged and stop when the battery is fully charged. Deep cycle batteries may require longer charging time. For estimates of the time it takes to charge a battery, refer to the following table. Percent of charge in battery 75% 50% 25% at 2 amp rate 7 HRS 14 HRS NR* at 10 amp rate 1.4 HRS 2.8 HRS 4.2 HRS at 15 amp rate 1 HRS 2 HRS 2.8 HRS *NR = Not recommended at 2 amps - use a higher charge rate. 0% NR* 5.5 HRS 3.7 HRS 7
-
 1
1 -
 2
2 -
 3
3 -
 4
4 -
 5
5 -
 6
6 -
 7
7 -
 8
8
 |
 |