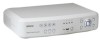
Bosch DVR4C1081 Installation Manual - Page 9
First-time use
 |
View all Bosch DVR4C1081 manuals
Add to My Manuals
Save this manual to your list of manuals |
Page 9 highlights
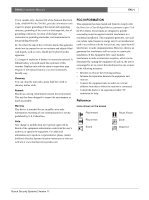
DVR4C | Installation Manual | Installation EN | 9 2.2 First-time use To open the quick install menu, press the MENU key on the front panel and select the Quick install submenu. Fill in the basic settings to get the unit operational. The unit begins recording automatically. Press the ESC key to close the menu. Pause (Up) Reverse (Left) Fast Forward (Right) Esc (escape/exit) Stop (Down) Play (Select) Navigating • Use the Reverse (left), Fast forward (right), Pause (up) and Stop (down) keys to move through a menu. • The Play key selects a submenu or menu item, or saves selections made in menus. • Use the ESC key to go back or to exit the menu. Changing Settings • Use the Play (select) key to start editing a value. • Use the Pause (up) and Stop (down) keys to change the value or text. • Use the Play (select) key to confirm the change, or • Use the Esc (escape/exit) key to cancel the change. >>> DAYLIGHT SAVING • Select if DST is used (On) or not (Off). >>> DATE FORMAT • Select from three date formats which show either the month (MM), the day (DD) or the year (YYYY) first. >>> TIME FORMAT • Select between 24 Hour and 12 Hour (AM/PM) format. >>> CURRENT TIME • Fill in the current time. >>> CURRENT DATE • Fill in the current date. >>> APPLY • Select this item to save your current time and date settings. Changing time settings All recorded video is time stamped for authentication. A linear timescale, with no gaps or overlaps, is used for searching and archiving. If you change the time, there is a mismatch between the time stamp and the linear timescale. This offset is displayed during playback on the right of the time stamp. To prevent mismatches, we recommend that you archive any important video and reformat the hard disk when you change the time. >> RECORDING 2.2.1 Quick Install Menu >> DATE/TIME >>> TIME ZONE • Select the correct time zone from a list. The default time zone is GMT 00:00. Bosch Security Systems | Version 1.1 >>> CONFIGURATION STATUS • This shows the current setting of the DVR. When the DVR is still configured in the same way as it was during the last quick install, the configuration status displays Original setup. Otherwise it shows Custom setup.
-
 1
1 -
2
-
3
-
 4
4 -
 5
5 -
 6
6 -
 7
7 -
 8
8 -
 9
9 -
 10
10 -
 11
11 -
 12
12 -
 13
13 -
 14
14 -
15
-
16
-
17
-
18
-
19
-
20
-
21
-
22
-
23
-
24
-
25
-
26
 |
 |
