Bosch HMC80152UC Installation Instructions - Page 5
Before you begin, Checklist for Installation, Removing Packaging - door removal
 |
View all Bosch HMC80152UC manuals
Add to My Manuals
Save this manual to your list of manuals |
Page 5 highlights
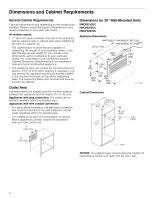
Before you begin Tools and parts needed ▯ Philips head screwdriver ▯ 1/8" drill bit and drill ▯ Measuring tape Parts included ▯ Microwave oven ▯ Philips head screws Power Requirements The outlet must be properly grounded in accordance with all applicable codes. It can be installed in the back wall directly behind the appliance. You can also connect your appliance directly to a compatible conventional Built-in Oven. Refer to separate Combination Instructions. Checklist for Installation Use this checklist to verify that you have completed each step of the installation process. This can help you avoid common mistakes. Refer to detailed instructions for each step in the sections following this checklist. 1. Before installing the appliance, be sure to verify the cabinet dimensions are correct for your appliance and that the required electrical connections are present. Make sure the electrical conduit provided on the appliance is able to reach to the point of connection. Section: Dimensions and Cabinet Requirements 2. Move the appliance into place in front of the cabinet opening. Section: Removing Packaging 3. Remove packaging materials, leaving the bottom packaging on the appliance to avoid damage to the floor. Section: Removing Packaging 4. Team-lift the appliance directly into the cabinet cutout. Section: Install Appliance, "Mount to Cabinet" 5. Slide the appliance all the way into place. Section: Install Appliance, "Mount to Cabinet" 6. Fasten the appliance to the cabinet opening with the screws supplied. Section: Install Appliance, "Mount to Cabinet" Always read and follow the complete installation instructions contained in this manual. Removing Packaging NOTICE: To prevent damage to your floor keep the unit in its packaging base until ready to be placed in the cabinet opening. Do not slide the unit across the flooring. Different models use different packaging materials. Bracket remains in packaging base. 1. Cut straps on outside of box. 2. Remove cardboard box. 3. Remove all top and side cardboard and Styrofoam braces. 4. Place oven in front of cabinets where it is to be installed. NOTICE: To avoid damage to the microwave oven, do not grip or use the door or door handle while the microwave oven is being handled. 5
-
 1
1 -
 2
2 -
 3
3 -
 4
4 -
 5
5 -
 6
6 -
 7
7 -
 8
8 -
 9
9 -
 10
10 -
 11
11 -
12
-
13
-
14
-
15
-
16
-
17
-
18
-
19
-
20
-
21
-
22
-
23
-
24
-
25
-
26
-
27
-
28
-
29
-
30
-
31
-
32
 |
 |
