Bosch HMV8052U Installation Instructions - Page 10
Attaching the mounting plate to the wall
 |
View all Bosch HMV8052U manuals
Add to My Manuals
Save this manual to your list of manuals |
Page 10 highlights
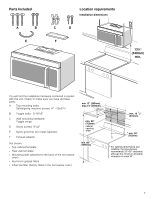
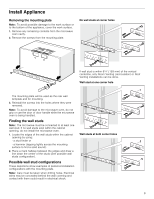
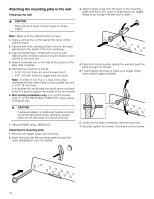
Attaching the mounting plate to the wall Preparing rear wall 9 CAUTION Wear gloves to avoid cutting fingers on sharp edges. 3. Attach toggle wings from the back of the mounting plate onto each bolt. Leave enough space for toggle wings to go through the wall and to open. Note: Make sure the cabinet bottom is level. 1. Draw a vertical line on the wall at the center of the cabinet space. 2. Cabinet with front overhang: Draw a line on the back wall equal to the depth of the front overhang. 3. Tape the REAR WALL TEMPLATE onto the wall matching the centerline and touching the bottom of the cabinet or the level line. 4. Draw a horizontal line on the wall at the bottom of the Rear Wall Template. 5. Drill holes at locations A and B: ▯ 3/16" (5 mm) holes for wood screws (stud) ▯ 5/8" (16 mm) holes for toggle bolts (no stud) Note: If neither A nor B is in a stud, find a stud somewhere in the area of the mounting plate and drill a 3/16" (5 mm) hole. It is important to use at least one wood screw mounted firmly in a stud to support the weight of the microwave. 6. Wall venting installation only: Cut out the shaded area "F" on the REAR WALL TEMPLATE using a saber or keyhole saw. 4. Place the mounting plate against the wall and push the bolts through the drywall. 5. Finger tighten the bolts to make sure toggle wings have opened against drywall. 9 CAUTION If exhaust adaptor is positioned outside consider recommended dimensions, otherwise greaseladen air will discharge into house structure. 7. Remove REAR WALL TEMPLATE. Attaching the mounting plate 1. Remove the toggle wings from the bolts. 2. Insert the bolts into the mounting plate through the holes designated to go into drywall. 6. Verify that the plate is properly centered and level. 7. Securely tighten all screws, including the wood screw. 10
-
 1
1 -
2
-
3
-
4
-
 5
5 -
 6
6 -
 7
7 -
 8
8 -
 9
9 -
 10
10 -
 11
11 -
 12
12 -
 13
13 -
 14
14 -
 15
15 -
16
-
17
-
18
-
19
-
20
-
21
-
22
-
23
-
24
-
25
-
26
-
27
-
28
-
29
-
30
-
31
-
32
 |
 |
