Bosch SHE89PW55N Instructions for Use - Page 11
Operating panel, Dishwasher interior, components, Display indicators, Info button, Time setting - dishwasher manual
 |
View all Bosch SHE89PW55N manuals
Add to My Manuals
Save this manual to your list of manuals |
Page 11 highlights
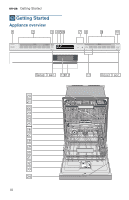
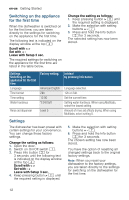
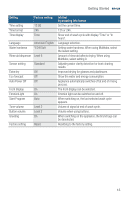
The numbers stated below refer to the overview images on the previous page of this manual. Operating panel ( On/Off button 0 Wash cycles 8 Info button @ Digital display H Rinse aid refill indicator P Salt refill indicator X Selection buttons ` Delay start button h Wash cycle options )" Start button )* < > button )2 Door handle ): Front display Dishwasher interior components 1" Interior light 1* Third rack 12 Upper rack 1: Upper spray arm 1B Detergent tab tray 1J Vent hole 1R Lower spray arm 1Z Dispenser for special salt 1b Filters 1j Silverware basket 9" Lower rack 9* Rinse aid dispenser 92 Detergent dispenser 9: Lock for detergent dispenser 9B Rating plate Display indicators Cycle time remaining Refill rinse aid indicator Lights up when rinse aid is low Refill salt indicator Lights up when salt is low Getting Started en-us Info button The notubofnI Info button 8 can be used to display additional wash cycle information. 1. Press the Info button 8. 2. Press the wash cycle button. Information on the selected wash cycle is indicated on the display window at the top @. 3. To leave, press Info button 8. Time setting When gnitesemiT the appliance is switched on for the first time, the time starts at 12:00 o'clock. Set the time as follows: 1. Open the door. 2. Switch on On/Off switch (. 3. Press Info button 8 for 3 seconds until the following text is indicated on the display window at the top @: Scroll with < > Set with - + Leave with Setup 3 sec. 4. Keep pressing button > )* until the time setting is indicated on the display window at the top @. 5. Make the setting with setting buttons + - X. If the selection buttons + - X are held down, the set values are changed in 10-minute increments. 6. Press and hold the Info button 8 for 3 seconds. The selected setting has now been stored. Note: If the appliance was disconnected from the power supply for a prolonged period, the time starts at 12:00 o'clock. Set the time. 11
-
 1
1 -
2
-
3
-
4
-
5
-
 6
6 -
 7
7 -
 8
8 -
 9
9 -
 10
10 -
 11
11 -
 12
12 -
 13
13 -
 14
14 -
 15
15 -
 16
16 -
17
-
18
-
19
-
20
-
21
-
22
-
23
-
24
-
25
-
26
-
27
-
28
-
29
-
30
-
31
-
32
-
33
-
34
-
35
-
36
-
37
-
38
-
39
-
40
-
41
-
42
-
43
-
44
-
45
-
46
-
47
-
48
-
49
-
50
-
51
-
52
-
53
-
54
-
55
-
56
-
57
-
58
-
59
-
60
-
61
-
62
-
63
-
64
-
65
-
66
-
67
-
68
-
69
-
70
-
71
-
72
-
73
-
74
-
75
-
76
-
77
-
78
-
79
-
80
-
81
-
82
-
83
-
84
-
85
-
86
-
87
-
88
-
89
-
90
-
91
-
92
-
93
-
94
-
95
-
96
-
97
-
98
-
99
-
100
-
101
-
102
-
103
-
104
-
105
-
106
-
107
-
108
 |
 |
