Bosch SRV53C13UC Instructions for Use - Page 71
Water Supply Shut Off Valve, Connecting the Hot Water Supply, To connect the hot water supply,
 |
View all Bosch SRV53C13UC manuals
Add to My Manuals
Save this manual to your list of manuals |
Page 71 highlights
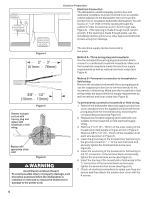
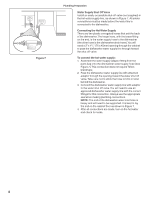
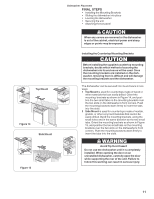
110-120V Water Shut Off Valve Dishwasher Water Inlet Hose Figure 7 Plumbing Preparation Water Supply Shut Off Valve Install an easily accessible shut-off valve (not supplied) in the hot water supply line, as shown in Figure 7. All solder connections must be made before the water line is connected to the dishwasher. Connecting the Hot Water Supply There are two plastic corrugated hoses that exit the back of the dishwasher. The larger hose, with the brass fitting on the end, is the water supply hose to the dishwasher (the other hose is the dishwasher drain hose). You will need a 3" x 13/4" (76 x 45mm) opening through the cabinet to pass the dishwasher water supply line through toward the shut off valve. To connect the hot water supply: 1. Assemble the water supply adaptor fitting from the parts bag onto the dishwasher water supply hose (see Figure 7). This connection does not require Teflon brand tape. 2. Pass the dishwasher water supply line with attached adaptor through the opening toward the water shut off valve. Take care not to allow the hose to kink or twist behind the dishwasher. 3. Connect the dishwasher water supply line with adaptor to the water shut off valve. You will need to use an approved dishwasher water supply line with the correct fittings for this connection. Always use the appropriate seal when making plumbing connections. NOTE: The end of the dishwasher water inlet hose is heavy and will need to be supported. It is best to lay the end on the cabinet floor as shown in Figure 7. 4. After all connections are made, turn on the hot water and check for leaks. 8
-
 1
1 -
2
-
3
-
4
-
5
-
6
-
7
-
8
-
9
-
10
-
11
-
12
-
13
-
14
-
15
-
16
-
17
-
18
-
19
-
20
-
21
-
22
-
23
-
24
-
25
-
26
-
27
-
28
-
29
-
30
-
31
-
32
-
33
-
34
-
35
-
36
-
37
-
38
-
39
-
40
-
41
-
42
-
43
-
44
-
45
-
46
-
47
-
48
-
49
-
50
-
51
-
52
-
53
-
54
-
55
-
56
-
57
-
58
-
59
-
60
-
61
-
62
-
63
-
64
-
65
-
 66
66 -
 67
67 -
 68
68 -
 69
69 -
 70
70 -
 71
71 -
 72
72 -
 73
73 -
 74
74 -
 75
75 -
 76
76 -
77
-
78
-
79
-
80
-
81
-
82
-
83
-
84
-
85
-
86
-
87
-
88
-
89
-
90
-
91
-
92
-
93
-
94
-
95
-
96
-
97
-
98
-
99
-
100
-
101
-
102
-
103
-
104
-
105
-
106
 |
 |
