Bose 251 Owner's guide - Page 6
Installing the mounting brackets, Choosing the speaker wire - environmental speakers
 |
UPC - 017817263566
View all Bose 251 manuals
Add to My Manuals
Save this manual to your list of manuals |
Page 6 highlights
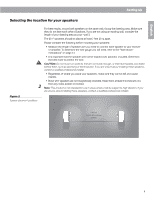
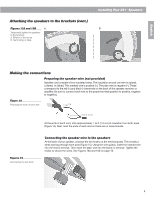
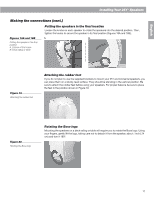
English Installing Your 251TM Speakers Choosing the speaker wire Be sure to use the proper gauge (thickness) of speaker wire. Standard zip cord (2-conductor, 18-gauge wire found at electrical and hardware stores) works for most applications. If your speakers will be more than 30 feet (9 m) from the receiver or amplifier, see the "Wire recommendations" under "Technical Information" on page 13. Or check with your authorized Bose® dealer. If you decide to run the speaker wire through a wall or underground, check your local building code requirements, or contact an electrical installer before proceeding. Note: Be sure to cut enough wire to reach from the receiver to each speaker. CAUTION: Before making any connections, turn off your receiver or amplifier and unplug it from the outlet (the AC power mains). Installing the mounting brackets The 251TM speakers should be mounted using the supplied brackets. They can be mounted onto the exterior of a house or onto a deck railing or table. If you choose not to use the supplied brackets, be sure to position your 251 speakers on a sturdy surface. CAUTION: If you do not use the supplied brackets, choose a level surface for the speakers. Vibration can cause the speakers to move, so it is important that you install the supplied rubber feet before using the speakers on a surface. Refer to "Attaching the rubber feet" on page 11. Installing the brackets onto the exterior of a house The 251 speakers should be mounted in a vertical position to achieve the best musical performance. Figure 3 illustrates how the mounted speaker will look once the installation is complete. To begin, mark four holes to indicate where you want to install the speaker bracket (Figure 4). For wood, drill four starter holes using a ⁄3 inch (2,5 mm) drill bit (Figure 5). For ce- 32 ment, drill four starter holes using a ⁄1 inch (6,0 mm) drill bit (Figure 5). 4 Figure 3 251 environmental speaker mounted onto the exterior of a house Figure 4 Marking four holes on the exterior of a house Figure 5 Drilling four holes on the exterior of a house 6
-
 1
1 -
 2
2 -
 3
3 -
 4
4 -
 5
5 -
 6
6 -
 7
7 -
 8
8 -
 9
9 -
 10
10 -
 11
11 -
 12
12 -
13
-
14
 |
 |