Bose Acoustimass 3 Powered Owner's guide - Page 9
Acoustimass
 |
View all Bose Acoustimass 3 Powered manuals
Add to My Manuals
Save this manual to your list of manuals |
Page 9 highlights
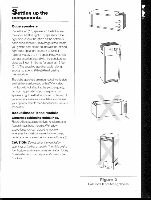
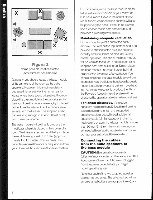
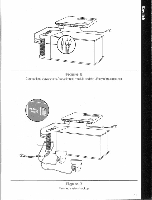
the plain one is always negative (-). These correspond to the positive (red) and negative (black) terminals on the backs of the speakers and the Acoustimass' bass module. Always connect the wires to their corresponding terminals (positive to positive. negative to negative). If youneed to lengthen the supplied speaker cable, splice in similar gauge a thicker cable, taking care to make the connections properly, positive to positive, negative to negative. Using the thumbnailrecesses, carefully remove the plastic covers on the back of the cube speakers (Figure 4). oC Figure 4 Removing a cube speaker's plastic cover 2 Connect one end of the first speaker cable to the terminals on the rear of the left cube speaker. and the other end to the left ("L") terminals on the rear of the Acoustimass bass module marked "OUTPUTS TO SPEAKERS." Simply push each terminal tab down, insert the ICI end of the appropriate wire into the exposed VI hole,andrelease the tab to secure the wire in place (Figure 5). mxxo 0 CO * aft Figure 5 Properly connecting wires between the cube speakers and the Acoustimass module terminals 3 Replace the cube speaker's plastic cover. 4 Check all connections to be sure they are positive to positive (4- to +), and negative to negative(- to-). Make sure that no strands of wire from any terminal are brushing against any other terminal. Such "bridged" wires create short circuits that may damage your Powered Acoustimass-3 Speaker system. 5 Repeat steps 1- 4 to connect the right cube speaker to theright('R") terminals on therear of the Acoustimass bass module.
-
 1
1 -
2
-
3
-
 4
4 -
 5
5 -
 6
6 -
 7
7 -
 8
8 -
 9
9 -
 10
10 -
 11
11 -
 12
12 -
 13
13 -
 14
14 -
15
-
16
-
17
-
18
-
19
 |
 |
