Bose Companion 3 Owners Guide - Page 11
The speakers mounted on the monitor are designed to perform at their best
 |
UPC - 017817541114
View all Bose Companion 3 manuals
Add to My Manuals
Save this manual to your list of manuals |
Page 11 highlights
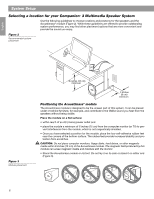
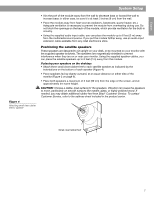
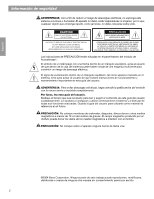
English System Setup 5. Center the bracket opening over the screw hole and press the bracket snugly into the speaker cutouts. Rotate the bracket counterclockwise to secure. Install the supplied screw. 6. Peel off the remaining tape on the mounting adhesive, and attach the bracket to the appropriate side of the monitor. Right bracket 7. Repeat steps 1-6 for the left bracket, marked L. 8. Note: The speakers mounted on the monitor are designed to perform at their best when they are angled slightly away from the listener. This orientation provides the most lifelike performance for the seated listener, and expands coverage for other listeners in the room. 9
-
 1
1 -
2
-
3
-
4
-
5
-
 6
6 -
 7
7 -
 8
8 -
 9
9 -
 10
10 -
 11
11 -
 12
12 -
 13
13 -
 14
14 -
 15
15 -
 16
16 -
17
-
18
-
19
-
20
-
21
-
22
-
23
-
24
-
25
-
26
-
27
-
28
-
29
-
30
-
31
-
32
-
33
-
34
-
35
-
36
-
37
-
38
-
39
-
40
 |
 |

9
System Setup
English
5.
Center the bracket opening over
the screw hole and press the
bracket snugly into the speaker
cutouts. Rotate the bracket
counterclockwise to secure. Install
the supplied screw.
6.
Peel off the remaining tape on the mounting
adhesive, and attach the bracket to the
appropriate side of the monitor.
7.
Repeat steps 1-6 for the left bracket, marked L.
Note:
The speakers mounted on the monitor are designed to perform at their best
when they are angled slightly away from the listener. This orientation provides the
most lifelike performance for the seated listener, and expands coverage for other
listeners in the room.
Right
bracket