Bose V35 Owner's guide - Page 26
Adjusting the system setup - video review
 |
View all Bose V35 manuals
Add to My Manuals
Save this manual to your list of manuals |
Page 26 highlights
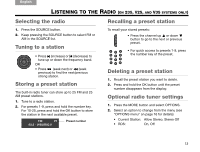
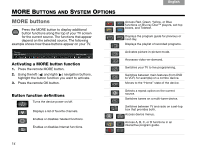
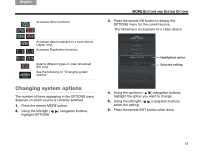
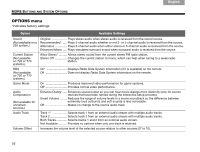
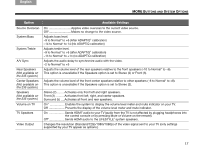
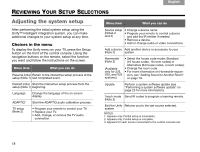
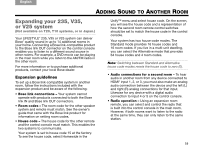
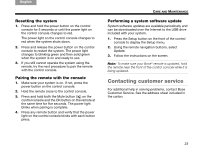
TAB 8 TAB 7 TAB 6 TAB 5 TAB 4 TAB 3 TAB 2 English REVIEWING YOUR SETUP SELECTIONS Adjusting the system setup After performing the initial system setup using the Unify™ intelligent integration system, you can make additional changes to your system setup at any time. Choices in the menu To display the Unify menu on your TV, press the Setup button on the front of the control console. Using the navigation buttons on the remote, select the function you want and follow the instructions on the screen. Menu item What you can do Resume initial Return to the interactive setup process at the setup (Note 1) last completed event. Restart initial Start the interactive setup process from the setup (Note 1) beginning. Language Change the language of the on screen display. ADAPTiQ® Start the ADAPTiQ audio calibration process. TV setup (Note 2) • Program your remote to control your TV. • Replace your TV. • Add, change, or remove the TV audio connection. Menu item What you can do Source setup • Change a device name. (Notes 2 and 3) • Program your remote to control a device and add the IR emitter if needed. • Remove a device. • Add or change audio or video connections. Add a device Add another device or accessory to your (Note 2) system. Homewide • Select the house code mode: Standard (Note 2) (16 house codes, 16 room codes) or Alternative (64 house codes, 4 room codes). (Available • Change the room code. only for 235, • For more information on Homewide expan- V35, and V25 sion, see "Adding Sound to Another Room" systems.) on page 19. Update Perform a system software update (see "Performing a system software update" on page 23 for more information). Teach mode Send IR codes to program a learning remote. (Note 2) Exit the Unify Returns you to the last source selected. system NOTES: 1. Appears only if initial setup is incomplete. 2. Appears only if initial setup is complete. 3. Appears for each source connected to the control console rear. 18
-
 1
1 -
2
-
3
-
4
-
5
-
6
-
7
-
8
-
9
-
10
-
11
-
12
-
13
-
14
-
15
-
16
-
17
-
18
-
19
-
20
-
 21
21 -
 22
22 -
 23
23 -
 24
24 -
 25
25 -
 26
26 -
 27
27 -
 28
28 -
 29
29 -
 30
30 -
 31
31 -
32
-
33
-
34
 |
 |