Boss Audio BV9986BI User Manual in Spanish - Page 40
Audio Setup - 7 manual pdf
 |
View all Boss Audio BV9986BI manuals
Add to My Manuals
Save this manual to your list of manuals |
Page 40 highlights
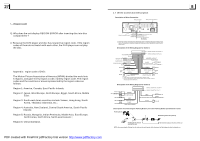
11.To do setup To do setup, tap the icon in the Main Menu to turn to SETUP interface as right. In the interface, select one of GENERAL, TIME, AUDIO, VIDEO ,RADIO , STEERING WHEEL CONTROL, CALIBRATE by tapping them, then set them by tapping some icons on the right side accordingly. 3. Radio Operation GENERAL SETUP 1. Enter RADIO mode When you use MODE button or Mode Menu to enter RADIO mode, it will display RADIO interface as right. In RADIO interface, tapping the icon can enter Mode Menu; during playback ,tapping the icon can turn to frequency interface as right; the other icons are same as ones in the unit panel or in the Remote Control. In menu set interface, you can adjust MUTE, APS, EQ, TA, AF, PTY as right. RADIO interface 2. BAND BUTTON In RADIO mode, press the BAND button on the remote control to select your desired radio band of FM1, FM2, FM3, AM1 and AM2, and the word means which band is selected will be displayed on the small monitor of the front panel. 3. TUNE/SEEK UP/DOWN BUTTONS In RADIO mode: AUDIO & VIDEO SETUP interface 1) Press and hold the >>|/|>| / |
-
 1
1 -
2
-
3
-
4
-
5
-
6
-
7
-
8
-
9
-
10
-
11
-
12
-
13
-
14
-
15
-
16
-
17
-
18
-
19
-
20
-
21
-
22
-
23
-
24
-
25
-
26
-
27
-
28
-
29
-
30
-
31
-
32
-
33
-
34
-
 35
35 -
 36
36 -
 37
37 -
 38
38 -
 39
39 -
 40
40 -
 41
41 -
 42
42 -
 43
43 -
 44
44 -
 45
45 -
46
 |
 |
