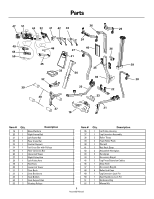
Bowflex PR3000 Assembly Manual - Page 10
Step 5: Attach the Pulley Arms
 |
View all Bowflex PR3000 manuals
Add to My Manuals
Save this manual to your list of manuals |
Page 10 highlights
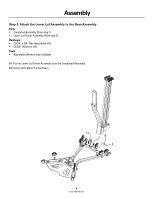
Assembly Step 5: Attach the Pulley Arms Parts • Right Pulley Arm (#27) • Left Pulley Arm (#28) • Completed Assembly (from step 4) Hardware • (4) 3/8" x 3/4" Hex Head Bolts (#1) • (4) 3/8" Washers (#5) • (2) 1/2" x 9 1/2" Threaded Studs (#11) • (4) 1/2" Wide Washers (#8) • (4) 1/2" Nylock Nuts (#9) Tools • (2) Adjustable Wrenches (not included) 5-1 Attach the the Right and Left Pulley Arms to the Completed Assembly. 5-2 Install and tighten the hardware. 27 11 9 8 1 5 28 9 8 10 Assembly Manual
-
 1
1 -
2
-
3
-
4
-
 5
5 -
 6
6 -
 7
7 -
 8
8 -
 9
9 -
 10
10 -
 11
11 -
 12
12 -
 13
13 -
 14
14 -
 15
15 -
16
-
17
-
18
-
19
-
20
-
21
-
22
-
23
-
24
 |
 |

Assembly
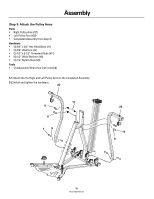
Step 5: Attach the Pulley Arms
Parts
•
Right Pulley Arm (#27)
•
Left Pulley Arm (#28)
•
Completed Assembly (from step 4)
Hardware
•
(4) 3/8” x 3/4” Hex Head Bolts (#1)
•
(4) 3/8” Washers (#5)
•
(2) 1/2” x 9 1/2” Threaded Studs (#11)
•
(4) 1/2” Wide Washers (#8)
•
(4) 1/2” Nylock Nuts (#9)
Tools
•
(2) Adjustable Wrenches (not included)
5-1
Attach the the Right and Left Pulley Arms to the Completed Assembly.
5-2
Install and tighten the hardware.
5
1
9
8
9
11
8
27
28
Assembly Manual
10