Brother International ADS-4300N Brother ScanEssentials Users Guide - Page 5
Interface Icons, Application Settings, Admin Settings, Create Workflow, Workflow / One Touch Workflow
 |
View all Brother International ADS-4300N manuals
Add to My Manuals
Save this manual to your list of manuals |
Page 5 highlights
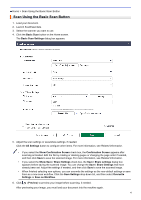
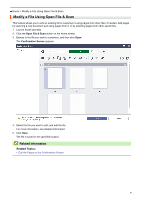
Click to display detailed status information about the selected machine. Interface Icons Icon Description Indicates USB connection. Indicates network connection. 2. Application Settings / Admin Settings • Application Settings Check the applications general information. • Admin Settings If you are the IT administrator, this allows you to configure application settings and configure email server settings. Some functions are supported only in the application's Standard version. 3. Create Workflow Create a workflow with preferred settings to allow you to quickly and efficiently perform scanning tasks. After creating workflow, either one of the two icons shown in (4) appears. 4. Workflow / One Touch Workflow Icon Description Workflow Click to check the scan settings before scanning. One Touch Workflow Click to automatically start scanning using your custom scan settings. 5. Mode Switch Switch to one touch mode and to display only One Touch workflow icons. Click again to return to the Home screen. 6. Open File & Scan Open an existing file so you can add scanned images to pages, rotate or delete pages, change page order, and other page edits. 7. Basic Scan Perform all the basic operations related to the scanning function including creating a workflow. 2
-
 1
1 -
 2
2 -
 3
3 -
 4
4 -
 5
5 -
 6
6 -
 7
7 -
 8
8 -
 9
9 -
 10
10 -
 11
11 -
12
-
13
-
14
-
15
-
16
-
17
-
18
-
19
-
20
-
21
-
22
 |
 |
