Brother International BAS-416 Thread Tensions - English - Page 4
Check Springs, Thread Path
 |
View all Brother International BAS-416 manuals
Add to My Manuals
Save this manual to your list of manuals |
Page 4 highlights
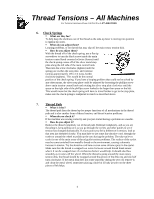
Thread Tensions - All Machines For Technical Assistance Please Call Toll Free 1-877-4BROTHER 6. Check Springs !" What are they for? To help keep the slackness out of the thread as the take-up lever is moving into position to tighten the stitch. !" When do you adjust them? Looping problems, or for thread that may slip off the main rotary tension disk. !" How do you adjust them? With the thread off of the check spring, use a flat tip screwdriver to turn the black screw inside the main tension control knob counterclockwise (loosen) until the check spring comes off of the silver metal stop plate along the left side of the main control knob. Then turn the screw clockwise (tighten) until the spring just touches the stop plate, and continue turning approximately 1/8 to 1/4 turns, further clockwise (tighten). This would be the normal position of the check spring. If you have a looping problem that could not be solved by any other means, the silver stop plate could be adjusted by loosening the phillips screw above main tension control knob and rotating the silver stop plate clockwise until the space on the right side of the phillips screw looked to be larger than space on the left. This would mean that the check spring will have to travel further to get to the stop plate, make sure the check spring is readjusted to match as described above. 7. Thread Path !" What is it for? The thread path lines the thread up for proper functions of all mechanisms in the thread path and is also another form of thread tension, and thread tension problems. !" When do you check it? If the machine was sewing correctly and you just started having a problem on a needle. !" How do you adjust it? Remove the thread completely out of thread path. Rethread completely, and as you are threading it, keep pulling on it as you go through the eyelets and other guides to see if tension has changed dramatically. If at any point you feel a difference in tension, look at that area just threaded closely. You may have to use some fine abrasive cord, through the eyelet or around the wheel to polish up the area having the problem. The take-up lever eyelet is one of the main areas of thread guide tension problems. The surface of the eyelet may be come tarnished from metallic thread or the environment, causing a dramatic increase in tension. Try the abrasive cord here or even some silicone spray in the eyelet. Make sure that the thread is wrapped two turns clockwise around thread break sensor wheel. It can be wrapped more if a technician feels it would help. It should also flow smoothly as it comes off the wheel. When the thread is going around the main rotary tension disk, the thread should be wrapped around the groove of the disk one and one half turns clockwise. If the metal disk does not rotate smoothly during the sew off, remove it, and clean the metal wheel, sometimes placing a little bit of baby powder on the three pieces of felt helps. 4
-
 1
1 -
 2
2 -
 3
3 -
 4
4 -
 5
5
 |
 |
