Brother International BAS-416 Thread Tensions - English - Page 5
Other Notes - a
 |
View all Brother International BAS-416 manuals
Add to My Manuals
Save this manual to your list of manuals |
Page 5 highlights
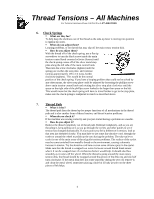
Thread Tensions - All Machines For Technical Assistance Please Call Toll Free 1-877-4BROTHER 8. Other Notes !" All the above notes, suggestions, recommendations, solutions, etc. are all just guidelines to setting tensions and correcting tension problems. The first thing to always do is to look for the obvious. For example, if you are having "FALSE THREAD BREAKS". Look at the thread break sensor of your machine. Is it turning or moving properly? Usually you will find that if its not functioning. You must find out why it does not move. On rotary thread break sensors; if the tension is to light coming from the top of it, the loop of thread around the wheel cannot grasp the wheel tight enough to turn it. You may find the problem by examining the area just before the wheel. Usually found is lint or dust under the plate, that the thread is slides under. If too much lint has accumulated in that are, it will not apply enough tension on the thread. On the newer style pretensioners with the white knob, spring and two tension disks the thread is suppose to pass between the disks to the left. Sometimes these disks look parallel, but need to be straightened. !" The next thing to do is set bobbin tension. The bobbin is used with every needle. All bobbins are not wound exactly the same. As a precaution, you may want to check your bobbin tension when replacing the bobbin. When sewing hats, the lint from some hats fall into the bobbin causing the tension to change, even after a few hats, so check and clean the bobbin case often when sewing hats. Clean the bobbin tension spring, set the anti-spin spring and try again. !" Now that the bobbin is set to an exact tension you can adjust the top tensions. This is easy to do once the bobbin has been set. Sew out the bobbin tension test most of you should have. Which is nine or twelve different color letters, depending on the amount of needles your machine has. This could be a letter "H" sewn out at 1"and add plenty of pull comp to make them wide. Or the "I" test also with plenty of pull comp to be wide. After sewing this, look at the bottom of sew out to determine proper tensions. Ideally, you should see the white streak of bobbin as wide as the two outer streaks of thread 1/3, 1/3, 1/3. Anything close is acceptable. If all the needles are the same width, but the bobbin streak is thinner, you can adjust the bobbin by loosening it, then all the streaks will become wider on the next sew off. But by doing this, you have changed your bobbin tension to a lighter setting. You could change each individual top main tensioner instead by tightening each of them one turn clockwise, which will cause the bobbin streak to become wider on the next sew off. Take a good look before adjusting too much and if the bottom of your sewing is not picture perfect adjust to the best of your ability. !" To review... Step 1. Look for the obvious Step 2. Adjust the bobbin case Step 3. Check the thread path Step 4. Check the pretensioners Step 5. Adjust the main tension 5
-
 1
1 -
 2
2 -
 3
3 -
 4
4 -
 5
5
 |
 |
