Brother International CS7130 Operation Manual - Page 20
Using the needle threader for models, equipped with the needle threader
 |
View all Brother International CS7130 manuals
Add to My Manuals
Save this manual to your list of manuals |
Page 20 highlights
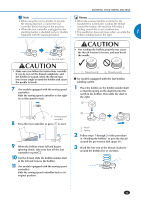
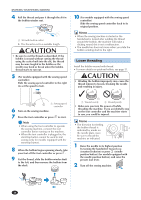
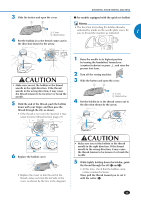
KNOWING YOUR SEWING MACHINE Memo • If the needle is not raised, the thread takeup lever cannot be threaded. Be sure to raise the needle before threading the sewing machine. 9 Put the thread behind the needle bar thread guide. 1 1 Needle bar thread guide 10 Turn off the sewing machine. CAUTION • Make sure you turn the power off while threading the machine without using the needle threader (for models equipped with the needle threader). If you accidentally step on the foot controller and the machine starts to sew, you could be injured. 11 Thread the needle from front to back and pull out about 5 cm (2 inches) of thread. ■■Using the needle threader (for models equipped with the needle threader) CAUTION • The needle threader can be used with a 75/11 through 100/16 home sewing machine needle. However, the needle threader cannot be used with a 65/9 home sewing machine needle. When using special thread such as transparent nylon thread or metallic thread, the needle threader cannot be used. • Thread with a thickness of 130/120 or thicker cannot be used with the needle threader. • The needle threader cannot be used with the wing needle or the twin needle. • If the needle threader cannot be used, refer to "Upper threading" (page 16). 1 Follow steps 1 through 10 of the procedure in "Upper threading". 2 Lower the presser foot lever. 3 While lowering the needle threader lever, hook the thread onto the guide. 1 Needle holder 2 Needle threader lever 3 Guide 4 Fully lower the needle threader lever. 1 5 cm (2 inches) Note • If the thread take-up lever is lowered, the upper thread cannot be wrapped around the thread take-up lever. Make sure you raise the presser foot lever and the thread take-up lever before you feed the upper thread. • If you incorrectly feed the thread you may cause sewing problems. XX The hook passes through the eye of the needle, and catch the thread. 1 Hook 2 Thread 18
-
 1
1 -
2
-
3
-
4
-
5
-
6
-
7
-
8
-
9
-
10
-
11
-
12
-
13
-
14
-
 15
15 -
 16
16 -
 17
17 -
 18
18 -
 19
19 -
 20
20 -
 21
21 -
 22
22 -
 23
23 -
 24
24 -
 25
25 -
26
-
27
-
28
-
29
-
30
-
31
-
32
-
33
-
34
-
35
-
36
-
37
-
38
-
39
-
40
-
41
-
42
-
43
-
44
-
45
-
46
-
47
-
48
-
49
-
50
-
51
-
52
-
53
-
54
-
55
-
56
-
57
-
58
-
59
-
60
-
61
-
62
-
63
-
64
-
65
-
66
-
67
-
68
-
69
-
70
-
71
-
72
-
73
-
74
-
75
-
76
 |
 |
