Brother International Duetta 2 4750D Users Manual - English - Page 49
Changing The Presser Foot
 |
View all Brother International Duetta 2 4750D manuals
Add to My Manuals
Save this manual to your list of manuals |
Page 49 highlights
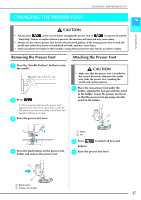
CHANGING THE PRESSER FOOT CHANGING THE PRESSER FOOT CAUTION 1 Getting Ready • Always press on the screen before changing the presser foot. If is not pressed and the "Start/Stop" button or another button is pressed, the machine will start and may cause injury. • Always use the correct presser foot for the selected stitch pattern. If the wrong presser foot is used, the needle may strike the presser foot and bend or break, and may cause injury. • Only use presser feet made for this machine. Using other presser feet may lead to accident or injury. Removing the Presser Foot Attaching the Presser Foot a Press the "Needle the needle. Position" button to raise b Press . * If "OK to automatically lower the presser foot?" appears on the LCD screen, press OK to continue. → The entire screen becomes white, and all keys and operation buttons are locked. c Raise the presser foot lever. CAUTION • Make sure that the presser foot is installed in the correct direction, otherwise the needle may strike the presser foot, breaking the needle and causing injuries. a Place the new presser foot under the holder, aligning the foot pin with the notch in the holder. Lower the presser foot lever so that the presser foot pin snaps into the notch in the holder. a b d Press the black button on the presser holder and remove the presser foot. foot a Notch b Pin b Press buttons. to unlock all keys and c Raise the presser foot lever. a b a Black button b Presser foot holder 37
-
 1
1 -
2
-
3
-
4
-
5
-
6
-
7
-
8
-
9
-
10
-
11
-
12
-
13
-
14
-
15
-
16
-
17
-
18
-
19
-
20
-
21
-
22
-
23
-
24
-
25
-
26
-
27
-
28
-
29
-
30
-
31
-
32
-
33
-
34
-
35
-
36
-
37
-
38
-
39
-
40
-
41
-
42
-
43
-
 44
44 -
 45
45 -
 46
46 -
 47
47 -
 48
48 -
 49
49 -
 50
50 -
 51
51 -
 52
52 -
 53
53 -
 54
54 -
55
-
56
-
57
-
58
-
59
-
60
-
61
-
62
-
63
-
64
-
65
-
66
-
67
-
68
-
69
-
70
-
71
-
72
-
73
-
74
-
75
-
76
-
77
-
78
-
79
-
80
-
81
-
82
-
83
-
84
-
85
-
86
-
87
-
88
-
89
-
90
-
91
-
92
-
93
-
94
-
95
-
96
-
97
-
98
-
99
-
100
-
101
-
102
-
103
-
104
-
105
-
106
-
107
-
108
-
109
-
110
-
111
-
112
-
113
-
114
-
115
-
116
-
117
-
118
-
119
-
120
-
121
-
122
-
123
-
124
-
125
-
126
-
127
-
128
-
129
-
130
-
131
-
132
-
133
-
134
-
135
-
136
-
137
-
138
-
139
-
140
-
141
-
142
-
143
-
144
-
145
-
146
-
147
-
148
-
149
-
150
-
151
-
152
-
153
-
154
-
155
-
156
-
157
-
158
-
159
-
160
-
161
-
162
-
163
-
164
-
165
-
166
-
167
-
168
-
169
-
170
-
171
-
172
-
173
-
174
-
175
-
176
-
177
-
178
-
179
-
180
-
181
-
182
-
183
-
184
-
185
-
186
-
187
-
188
-
189
-
190
-
191
-
192
-
193
-
194
-
195
-
196
-
197
-
198
-
199
-
200
-
201
-
202
-
203
-
204
-
205
-
206
-
207
-
208
-
209
-
210
-
211
-
212
-
213
-
214
-
215
-
216
-
217
-
218
-
219
-
220
-
221
-
222
-
223
-
224
-
225
-
226
-
227
-
228
-
229
-
230
-
231
-
232
-
233
-
234
-
235
-
236
-
237
-
238
-
239
-
240
-
241
-
242
-
243
-
244
-
245
-
246
-
247
-
248
-
249
-
250
-
251
-
252
-
253
-
254
-
255
-
256
-
257
-
258
-
259
-
260
-
261
-
262
-
263
-
264
-
265
-
266
-
267
-
268
-
269
-
270
-
271
-
272
-
273
-
274
-
275
-
276
 |
 |
