Brother International EF4-B561 Service Manual - Page 20
-0.3mm
 |
View all Brother International EF4-B561 manuals
Add to My Manuals
Save this manual to your list of manuals |
Page 20 highlights
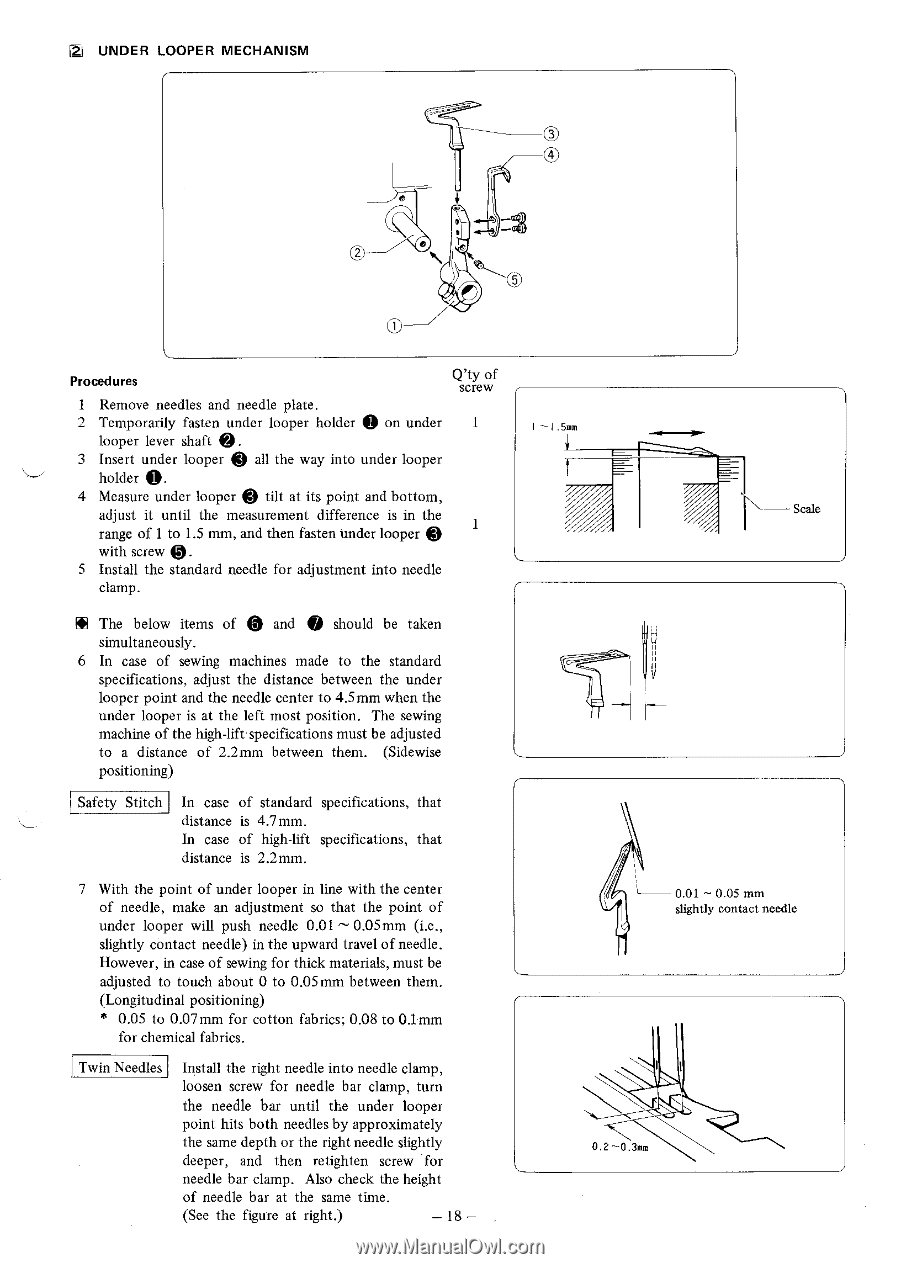
2 UNDER LOOPER MECHANISM C2) Procedures Q'ty of screw 1 Remove needles and needle plate. 2 Temporarily fasten under looper holder 0 on under 1 looper lever shaft 0. 3 Insert under looper Q all the way into under looper holder 0. 4 Measure under looper 0 tilt at its point and bottom, adjust it until the measurement difference is in the range of 1 to 1.5 mm, and then fasten under looper 1 with screw 0. 5 Install the standard needle for adjustment into needle clamp. EN The below items of et and 0 should be taken simultaneously. 6 In case of sewing machines made to the standard specifications, adjust the distance between the under looper point and the needle center to 4.5mm when the under looper is at the left most position. The sewing machine of the high-lift specifications must be adjusted to a distance of 2.2mm between them. (Sidewise positioning) Safety Stitch In case of standard specifications, that distance is 4.7mm. In case of high-lift specifications, that distance is 2.2mm. 7 With the point of under looper in line with the center of needle, make an adjustment so that the point of under looper will push needle 0.01 - 0.05mm (i.e., slightly contact needle) in the upward travel of needle. However, in case of sewing for thick materials, must be adjusted to touch about 0 to 0.05mm between them. (Longitudinal positioning) * 0.05 to 0.07mm for cotton fabrics; 0.08 to 0.1mm for chemical fabrics. Twin Needles Install the right needle into needle clamp, loosen screw for needle bar clamp, turn the needle bar until the under looper point hits both needles by approximately the same depth or the right needle slightly deeper, and then retighten screw for needle bar clamp. Also check the height of needle bar at the same time. (See the figure at right.) - 18 - I - I .5mm /A Scale 0.01 - 0.05mm slightly contact needle 0.2-0.3mm
-
 1
1 -
2
-
3
-
4
-
5
-
6
-
7
-
8
-
9
-
10
-
11
-
12
-
13
-
14
-
 15
15 -
 16
16 -
 17
17 -
 18
18 -
 19
19 -
 20
20 -
 21
21 -
 22
22 -
 23
23 -
 24
24 -
 25
25 -
26
-
27
-
28
-
29
-
30
-
31
-
32
-
33
-
34
-
35
-
36
-
37
-
38
-
39
 |
 |