Brother International HL-2400CEN Quick Setup Guide - English - Page 2
Remove the Protective Parts, Install the OPC Belt cartridge
 |
View all Brother International HL-2400CEN manuals
Add to My Manuals
Save this manual to your list of manuals |
Page 2 highlights
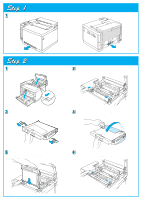
Step 1 Remove the Protective Parts Remove the protective parts, as shown. Step 2 Install the OPC Belt cartridge Open the Front Cover and then the Top Cover. Release both green Belt Cartridge Lock Levers by pulling them toward you. Remove the orange Belt Tension Release Pins from both sides of the OPC Belt cartridge. Install the OPC Belt Cartridge immediately after you remove the Protective Sheet. Insert the OPC Belt Cartridge into the printer cartridge guides with the flat side facing you. Lock the Belt Cartridge Lock Levers by pushing them backward until they click into place.
-
 1
1 -
 2
2 -
 3
3 -
 4
4
 |
 |

Release both green Belt Cartridge Lock Levers
by pulling them toward you.
Remove the orange Belt Tension Release Pins
from both sides of the OPC Belt cartridge.
Insert the OPC Belt Cartridge into the printer
cartridge guides with the flat side facing
you.
Lock the Belt Cartridge Lock Levers by pushing
them backward until they click into place.
Remove the protective parts, as shown.
Open the Front Cover and then the Top Cover.
Install the OPC
Belt Cartridge immediately
after you remove the Protective Sheet.
Step 1
Remove the Protective Parts
Step 1
Remove the Protective Parts
Step 2
Install the OPC Belt cartridge
Step 2
Install the OPC Belt cartridge