Brother International HL-L3210CW Reference Guide - Page 7
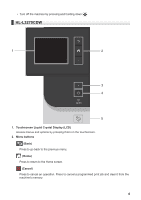
Network, Menu Buttons, Secure, Error LED, Error, Data LED, Cancel, Power On/Off
 |
View all Brother International HL-L3210CW manuals
Add to My Manuals
Save this manual to your list of manuals |
Page 7 highlights
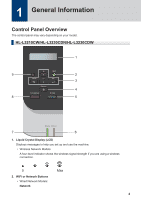
1 General Information Press the Network button to set up wired network settings. • Wireless Network Models: WiFi Launch the wireless installer on your computer and press the WiFi button. Follow the onscreen instructions to set up a wireless connection between your machine and your network. When the WiFi light is on, your Brother machine is connected to a wireless access point. When the WiFi light blinks, the wireless connection is down, or your machine is in the process of connecting to a wireless access point. 3. Menu Buttons OK Press to select the displayed option. After you change a setting, the machine returns to the previous menu level. Back • Press to go back one level in the menu. • Press to select the previous digit when entering numbers. a or b (+ or -) • Press to scroll through menus and options. • Press to enter or change a letter or number. Hold down a or b to scroll faster. When you see the letter or number you want, press OK. 4. Secure Press to print jobs saved in the memory when you enter your four-digit password. 5. Go • Press to clear certain error messages. To clear all other errors, follow the LCD instructions. • Press to print any data remaining in the machine's memory. • Press to select the displayed option. After you change a setting, the machine returns to Ready Mode. 6. Error LED The Error LED blinks when the LCD displays an error or an important status message. 7. Data LED The Data LED blinks depending on the machine's status. When the Data LED is on, data is in the machine's memory. When the Data LED blinks, the machine is receiving or processing data. 8. Cancel • Press to cancel the current setting. • Press to cancel a programmed print job and clear it from the machine's memory. To cancel multiple print jobs, hold down Cancel until the LCD displays [Cancel All Jobs]. 9. Power On/Off • Turn on the machine by pressing . 5
-
 1
1 -
 2
2 -
 3
3 -
 4
4 -
 5
5 -
 6
6 -
 7
7 -
 8
8 -
 9
9 -
 10
10 -
 11
11 -
 12
12 -
13
-
14
-
15
-
16
-
17
-
18
 |
 |
