Brother International HS-2500 Users Manual - English - Page 87
Incorrect thread tension
 |
View all Brother International HS-2500 manuals
Add to My Manuals
Save this manual to your list of manuals |
Page 87 highlights
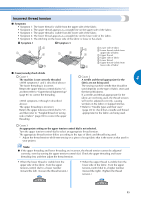
Incorrect thread tension ■ Symptoms • Symptom 1: The lower thread is visible from the upper side of the fabric. • Symptom 2: The upper thread appears as a straight line on the upper side of the fabric. • Symptom 3: The upper thread is visible from the lower side of the fabric. • Symptom 4: The lower thread appears as a straight line on the lower side of the fabric. • Symptom 5: The stitching on the lower side of the fabric is loose or has slack. † Symptom 1 † Symptom 3 a Lower side of fabric b Lower thread visible from upper side of fabric c Upper thread d Upper side of fabric e Lower thread f Upper thread visible from lower side of fabric ■ Cause/remedy/check details † Cause 1 The machine is not correctly threaded. The lower threading is incorrect. Return the upper tension-control dial to "4", and then refer to "Upper thread tightened up" (page 81) to correct the threading. The upper threading is incorrect. Return the upper tension-control dial to "4", and then refer to "Tangled thread on wrong side of fabric" (page 82) to correct the upper threading. † Cause 2 A needle and thread appropriate for the 4 fabric are not being used. The sewing machine needle that should be used depends on the type of fabric sewn and the thread thickness. If a needle and thread appropriate for the fabric are not being used, the thread tension will not be adjusted correctly, causing wrinkles in the fabric or skipped stitches. • Refer to "Needle types and their uses" (page 28) to check that a needle and thread appropriate for the fabric are being used. † Cause 3 An appropriate setting on the upper tension-control dial is not selected. Turn the upper tension-control dial to select an appropriate thread tension. The appropriate thread tension differs according to the type of fabric and thread being used. * Adjust the thread tension while test sewing on a piece of scrap fabric that is the same as that used in your project. Note ● If the upper threading and lower threading are incorrect, the thread tension cannot be adjusted correctly, even by turning the upper tension-control dial. Check the upper threading and lower threading first, and then adjust the thread tension. • When the lower thread is visible from the upper side of the fabric. Turn the upper tension-control dial to a lower number (toward the left). (Loosen the thread tension.) • When the upper thread is visible from the lower side of the fabric. Turn the upper tension-control dial to a higher number (toward the right). (Tighten the thread tension.) 54 3 54 3 85
-
 1
1 -
2
-
3
-
4
-
5
-
6
-
7
-
8
-
9
-
10
-
11
-
12
-
13
-
14
-
15
-
16
-
17
-
18
-
19
-
20
-
21
-
22
-
23
-
24
-
25
-
26
-
27
-
28
-
29
-
30
-
31
-
32
-
33
-
34
-
35
-
36
-
37
-
38
-
39
-
40
-
41
-
42
-
43
-
44
-
45
-
46
-
47
-
48
-
49
-
50
-
51
-
52
-
53
-
54
-
55
-
56
-
57
-
58
-
59
-
60
-
61
-
62
-
63
-
64
-
65
-
66
-
67
-
68
-
69
-
70
-
71
-
72
-
73
-
74
-
75
-
76
-
77
-
78
-
79
-
80
-
81
-
 82
82 -
 83
83 -
 84
84 -
 85
85 -
 86
86 -
 87
87 -
 88
88 -
 89
89 -
 90
90 -
 91
91 -
 92
92 -
93
-
94
-
95
-
96
-
97
-
98
-
99
-
100
 |
 |
