Brother International Innov-ís 1200 Users Manual - English - Page 16
Operation panel
 |
View all Brother International Innov-ís 1200 manuals
Add to My Manuals
Save this manual to your list of manuals |
Page 16 highlights
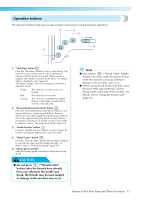
Operation panel The front operation panel has an LCD (liquid crystal display) and operation keys. a c d b e f i g a LCD (liquid crystal display) (touch panel) Selected pattern settings and messages are displayed. Touch the keys displayed on the LCD to perform operations. For details, refer to "LCD (Liquid Crystal Display) Operation" (page 18). b Back key Press to return to the previous screen. c Previous page key Displays the previous screen when there are items that are not displayed on the LCD. d Next page key Displays the next screen when there are items that are not displayed on the LCD. e Memory key Press to enter character embroidery, combined stitch patterns, My Custom Stitch patterns, etc into the sewing machine memory. h f Utility stitch key Press this key to select a utility stitch or decorative stitch or to design a stitch pattern using the My Custom Stitch function. g Embroidery key Press this key to sew embroidery. h Settings key Press to set the needle stop position, the buzzer sound, and more. i Sewing machine help key Press to get help on using the sewing machine. Displays simple explanations of setting upper thread / bobbin winding / setting bobbin thread / needle replacement / embroidery unit attachment / embroidery frame attachment / embroidery foot attachment / presser foot replacement. 14
-
 1
1 -
2
-
3
-
4
-
5
-
6
-
7
-
8
-
9
-
10
-
 11
11 -
 12
12 -
 13
13 -
 14
14 -
 15
15 -
 16
16 -
 17
17 -
 18
18 -
 19
19 -
 20
20 -
 21
21 -
22
-
23
-
24
-
25
-
26
-
27
-
28
-
29
-
30
-
31
-
32
-
33
-
34
-
35
-
36
-
37
-
38
-
39
-
40
-
41
-
42
-
43
-
44
-
45
-
46
-
47
-
48
-
49
-
50
-
51
-
52
-
53
-
54
-
55
-
56
-
57
-
58
-
59
-
60
-
61
-
62
-
63
-
64
-
65
-
66
-
67
-
68
-
69
-
70
-
71
-
72
-
73
-
74
-
75
-
76
-
77
-
78
-
79
-
80
-
81
-
82
-
83
-
84
-
85
-
86
-
87
-
88
-
89
-
90
-
91
-
92
-
93
-
94
-
95
-
96
-
97
-
98
-
99
-
100
-
101
-
102
-
103
-
104
-
105
-
106
-
107
-
108
-
109
-
110
-
111
-
112
-
113
-
114
-
115
-
116
-
117
-
118
-
119
-
120
-
121
-
122
-
123
-
124
-
125
-
126
-
127
-
128
-
129
-
130
-
131
-
132
-
133
-
134
-
135
-
136
-
137
-
138
-
139
-
140
-
141
-
142
-
143
-
144
-
145
-
146
-
147
-
148
-
149
-
150
-
151
-
152
-
153
-
154
-
155
-
156
-
157
-
158
-
159
-
160
-
161
-
162
-
163
-
164
-
165
-
166
-
167
-
168
-
169
-
170
-
171
-
172
-
173
-
174
-
175
-
176
-
177
-
178
-
179
-
180
-
181
-
182
-
183
-
184
-
185
-
186
-
187
-
188
-
189
-
190
-
191
-
192
-
193
-
194
-
195
-
196
-
197
-
198
 |
 |
