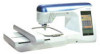
Brother International Innov-is 2800D Additional Operation Manual - Page 10
Hold the quilting foot in place with your right, presser bar.
 |
View all Brother International Innov-is 2800D manuals
Add to My Manuals
Save this manual to your list of manuals |
Page 10 highlights
a Press to set the machine to free-motion sewing mode. c Remove the presser foot holder. d Attach free-motion open toe quilting foot "O" by positioning the pin of the quilting foot above the needle clamp screw and aligning the lower-left of the quilting foot and the presser bar. 1 3 2 → The key appears as , and the quilting foot is raised to the necessary height for free-motion sewing. a Pin b Needle clamp screw c Presser bar Note Make sure that the quilting foot is attached properly and is not slanted. e Hold the quilting foot in place with your right hand, and tighten the presser foot holder screw using the screwdriver with your left hand. a Presser foot holder screw CAUTION • Be sure to tighten the screw securely with the screwdriver. Otherwise, the needle may touch the quilting foot, causing it to bend or break. f Use both hands to securely hold the fabric taut, and then move the fabric at a consistent pace in order to sew uniform stitches roughly 2.0-2.5 mm (approx. 1/16 - 3/32 inch) in length. b Select a stitch. → Free-motion open toe quilting foot "O" is indicated in the upper-left corner of the screen. Note If using straight stitch needle plate with the free-motion open toe quilting foot "O" then the letter "C" will be indicated in the upper-left corner of screen. a Stitch g Press mode. to cancel the free-motion sewing Memo Do not be discouraged with your initial results. The technique requires practice. 8
-
 1
1 -
2
-
3
-
4
-
 5
5 -
 6
6 -
 7
7 -
 8
8 -
 9
9 -
 10
10 -
 11
11 -
 12
12 -
 13
13 -
 14
14 -
 15
15 -
16
-
17
-
18
-
19
-
20
-
21
-
22
-
23
-
24
-
25
-
26
-
27
-
28
-
29
-
30
-
31
-
32
-
33
-
34
-
35
-
36
-
37
-
38
-
39
-
40
 |
 |
