Brother International Innov-is 6700D Operation Manual for Premium Pack I Optio - Page 12
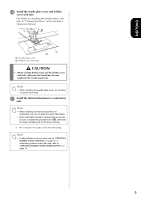
While gently holding threads at the rear of the, machine, turn the handwheel to feed
 |
View all Brother International Innov-is 6700D manuals
Add to My Manuals
Save this manual to your list of manuals |
Page 12 highlights
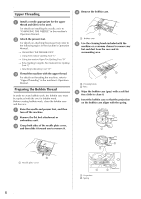
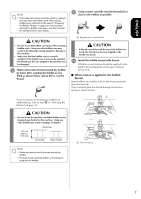
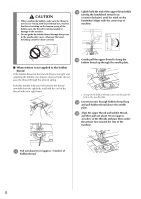
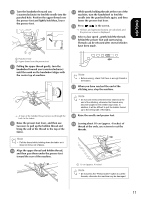
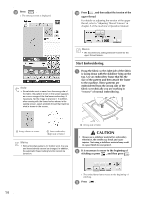
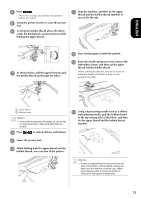
ENGLISH j Turn the handwheel toward you (counterclockwise) to feed the needle into the punched hole. Position the upper thread over the presser foot and lightly hold then, lower the presser foot. n While gently holding threads at the rear of the machine, turn the handwheel to feed the needle into the punched hole again, and then lower the presser foot lever. o Press in the screen. → All keys and operation buttons are unlocked, and the previous screen is displayed. p Select a low speed , gently hold the threads behind the presser foot and start sewing. Threads can be released after several stitches have been made. a Punched hole b Upper thread over the presser foot k Pulling the upper thread gently, turn the handwheel toward you (counterclockwise) until the mark on the handwheel aligns with the center top of machine. → A loop of the bobbin thread comes out through the hole in the fabric. l Raise the presser foot lever, and then use tweezers to pull up the bobbin thread and bring the end of the thread to the top of the fabric. Note • Pull the thread while holding down the fabric so it does not move out of place. m Align the upper thread and bobbin thread, and then pass them under the presser foot toward the rear of the machine. Note • Before sewing, check that there is enough thread in the bobbin. q When you have reached the end of the stitching area, stop the machine. Note • Do not sew reinforcement/reverse stitches at the end of the stitching, otherwise the threads may become tangled or the needle may break. In addition, it will be difficult to pull the bobbin thread up to the wrong side of the fabric. r Raise the needle and presser foot. s Leaving about 10 cm (approx. 4 inches) of thread at the ends, use scissors to cut the threads. a 10 cm (approx. 4 inches) Note • Do not press the "Thread Cutter" button to cut the threads, otherwise the machine may be damaged. 11
-
 1
1 -
2
-
3
-
4
-
5
-
6
-
 7
7 -
 8
8 -
 9
9 -
 10
10 -
 11
11 -
 12
12 -
 13
13 -
 14
14 -
 15
15 -
 16
16 -
 17
17 -
18
-
19
-
20
-
21
-
22
-
23
-
24
-
25
-
26
-
27
-
28
-
29
 |
 |
