Brother International IntelliFax-5750e Quick Setup Guide - English - Page 5
For Network Users - user manual
 |
View all Brother International IntelliFax-5750e manuals
Add to My Manuals
Save this manual to your list of manuals |
Page 5 highlights
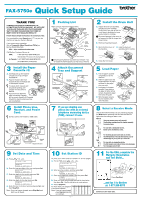
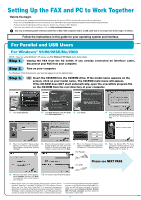
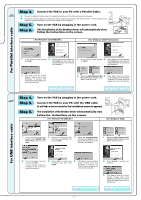
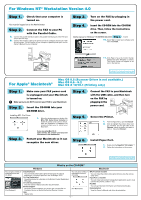
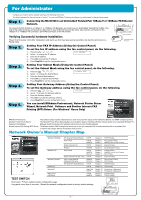
For Network Users NOTE: If you are going to connect the Fax to your network, we recommend that you contact your system administrator prior to installation. Driver Installation (Windows®) Step 1. Insert the CD-ROM into the CD-ROM drive. If the model name appears on the screen, click on your model name. The CD-ROM main menu will appear. If the CD-ROM does NOT start automatically, open the executible program file on the CD-ROM from the root directory of your computer. 1. Click Install Software. (To install the Printer Driver) 2. Click Network Applications for NC-8100h. 3. Click Printer Driver. (To install the Network PC-FAX) 4. If the Digital Signature Not Found dialog boxes appear, click Yes to install the driver. 5. The Printer Driver is installed on the comupter. 3. Click Network PC FAX. 4. When the Brother PC-FAX Installation window appears, click Next to begin installing the PC-FAX. 5. When the Choose Destination Location window displays the path where the PC-FAX files will be installed, click Next. 6. When the Select Program Folder window 7. When the above screen appears, click Finish displays, either change or accept, and then and wait as the PC restarts Windows®. click Next. NOTE: If you have previously installed the non-network version of Brother PC-FAX, steps 5 and 6 will not be displayed. The Printer and Network PC-FAX drivers are installed completely. • If you use the scanner or the PC-FAX, please see the NC-8100h Owner's Manual in the CD-ROM. • PaperPort® and Remote Setup are not available for network users. Driver Installation (Mac® OS 8.6 - 9.2) Step 1. Insert the CD-ROM into your CD-ROM drive. Step 2. 1. Click on MFL Pro Suite Installer. 2. When the above screen appears, select Network Interface and click Install. Restart your Macintosh so it can recognize the new driver. Step 3. Select the printer. The Printer and Network PC-FAX drivers are installed completely. - 5 -
-
 1
1 -
 2
2 -
 3
3 -
 4
4 -
 5
5 -
 6
6
 |
 |
