Brother International IntelliFax-5750e Quick Setup Guide - English - Page 6
For Administrator - network
 |
View all Brother International IntelliFax-5750e manuals
Add to My Manuals
Save this manual to your list of manuals |
Page 6 highlights
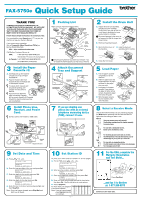
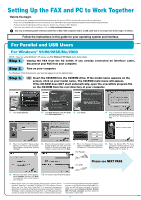
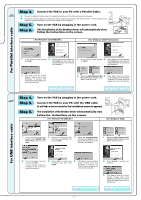
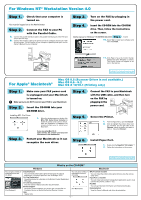
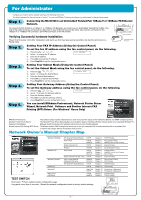
For Administrator - Configure your network printer settings referring to the following instructions. - The default password for the print server is "access". You can use BRAdmin Professional software or a web browser to change this password. Step 1. Connecting the NC-8100h to an Unshielded Twisted Pair 10Base-T or 100Base-TX Ethernet Network. To connect the NC-8100h to a 10Base-T or 100Base-TX Network, you must have an Unshielded Twisted Pair Cable. One side of the cable must be connected to a free port on your Ethernet hub and the other side must be connected to the 10Base-T or 100Base-TX connector (an RJ45 Connector) of the NC-8100h. Verifying Successful hardware Installation: Plug in the AC power cord. After initialization and warm-up (this may take several seconds), the machine will come to a Ready state. Step 2. Setting Your FAX IP Address (Using the Control Panel) To set the fax IP address using the fax control panel, do the following. 1. Press the , 5 , 1 , 2 . 2. Select 1 to change the IP address. 2.IP ADDRESS 3. Enter the IP address. 4. Press Set to accept the IP address. 5. Press Stop/Exit to exit the configuration menu. Step 3. Setting Your Subnet Mask (Using the Control Panel) To set the Subnet Mask using the fax control panel, do the following. 1. Press the , 5 , 1 , 3 . 2. Select 1 to change the Subnet Mask. 3. Enter the Subnet Mask address. 4. Press Set to accept the Subnet Mask. 5. Press Stop/Exit to exit the configuration menu. 3.SUBNET MASK Step 4. Step 5. Setting Your Gateway Address (Using the Control Panel) To set the Gateway address using the fax control panel, do the following. 1. Press the , 5 , 1 , 4 . 2. Select 1 to change the Gateway address. 3. Enter the Gateway address. 4. Press Set to accept the Gateway address. 5. Press Stop/Exit to exit the configuration menu. 4.GATEWAY You can install BRAdmin Professional, Network Printer Driver Wizard, Network Print Software and Brother Internet FAX Printing (BFP) Driver. (For Windows® Users Only) RJ45 Connector Unshielded Twisted Pair Cable BRAdmin Professional: This software allows system administrators to view and control the status of their networked Brother and SNMP compliant printers. Network Printer Driver Wizard: The Network Printer Driver Wizard guides you through the steps of installing a Brother network printer on a networked Windows PC. Network Print Software: Manually install the Internet Print software and the Peer-to-Peer Printing software. Brother Internet FAX Printing (BFP) Driver: The Brother Internet FAX Printing Driver allows you to use you networked PC to send a document file as a standard Fax or Internet Fax using E-mail as the transport from your PC. Network Owner's Manual Chapter Map Windows® 95/98/Me IPP (Internet Printing Protocol) TCP/IP Chapter 5 Peer-to-Peer TCP/IP NetBIOS Chapter 6 Chapter 7 Brother Internet Print TCP/IP Chapter 8 Netware IPX/SPX Chapter 9 Windows® NT Peer-to-Peer TCP/IP NetBIOS DLC/LLC Chapter 5 Chapter 7 Chapter 11 Brother Internet Print (NT® only) TCP/IP Chapter 8 Windows® 2000/XP Peer-to-Peer NetBIOS (Windows® 2000 only) NetBIOS Chapter 7 DLC/LLC Chapter 11 IPP (Internet Printing Protocol) TCP/IP Chapter 5 UNIX/Linux TCP/IP Chapter 12 Macintosh® Apple Talk Chapter 10 TCP/IP Chapter 10 Warp Server LAN Server TCP/IP NetBIOS Chapter 5 Chapter 5 TEST SWITCH Short push : Prints a network printer configuration page. Long push (more than 5 seconds) : Resets the network configuration back to factory default settings. TCP/IP Printing Peer to Peer Printing NetBIOS Peer to Peer Printing Internet Printing Novell Netware Printing TCP/IP Printing NetBIOS Peer to Peer Printing DLC Printing Internet Printing Peer to Peer Printing DLC Printing TCP/IP Printing Unix Printing Printing from a Macintosh Printing from a Macintosh TCP/IP Printing TCP/IP Printing Ethernet LED Test Switch RJ-45 - 6 -
-
 1
1 -
 2
2 -
 3
3 -
 4
4 -
 5
5 -
 6
6
 |
 |
