Brother International LX-3125 Users Manual - English and Spanish - Page 24
Starting to sew, Sewing in reverse - stitches
 |
View all Brother International LX-3125 manuals
Add to My Manuals
Save this manual to your list of manuals |
Page 24 highlights
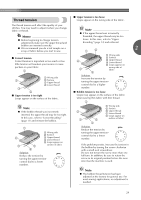
SEWING BASICS Starting to sew Lower the presser foot lever. f Turn on the sewing machine. a Raise the needle to its highest position by b turning the handwheel toward you (counterclockwise). a Presser foot lever Slowly press down on the foot controller. g Raise the presser foot lever. c a Presser foot lever Place the fabric under the presser foot, pass d the thread under the presser foot, and then pull out about 5 cm (2 inches) of thread toward the rear of the machine. X The machine starts sewing. Take your foot off the foot controller. h X The machine stops sewing. Raise the needle to its highest position by turning i the handwheel toward you (counterclockwise). Raise the presser foot lever. j Pull the fabric to the left side of the machine, and k then pass the threads through the thread cutter on the back of the presser foot bar to cut them. a 5 cm (2 inches) While holding the end of the thread and the e fabric with your left hand, turn the handwheel toward you (counterclockwise) with your right hand to lower the needle to the starting point of the stitching. a Thread cutter Sewing in reverse Reverse sewing is used to lock the threads at the end of the seam or wherever reinforcement is needed. Press and hold down the reverse sewing lever while sewing. a To sew forward, release the reverse sewing lever. b 23
-
 1
1 -
2
-
3
-
4
-
5
-
6
-
7
-
8
-
9
-
10
-
11
-
12
-
13
-
14
-
15
-
16
-
17
-
18
-
 19
19 -
 20
20 -
 21
21 -
 22
22 -
 23
23 -
 24
24 -
 25
25 -
 26
26 -
 27
27 -
 28
28 -
 29
29 -
30
-
31
-
32
-
33
-
34
-
35
-
36
-
37
-
38
-
39
-
40
-
41
-
42
-
43
-
44
-
45
-
46
-
47
-
48
-
49
-
50
-
51
-
52
-
53
-
54
-
55
-
56
-
57
-
58
-
59
-
60
-
61
-
62
-
63
-
64
-
65
-
66
-
67
-
68
-
69
-
70
-
71
-
72
-
73
-
74
-
75
-
76
-
77
-
78
-
79
-
80
-
81
-
82
-
83
-
84
-
85
-
86
-
87
-
88
-
89
-
90
-
91
-
92
-
93
-
94
-
95
-
96
 |
 |
