Brother International LX2500 Users Manual - English and Spanish - Page 15
Upper threading - sewing machine instructions
 |
View all Brother International LX2500 manuals
Add to My Manuals
Save this manual to your list of manuals |
Page 15 highlights
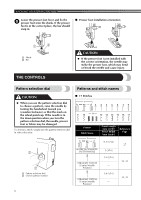
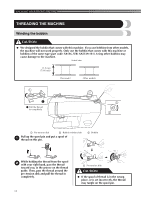
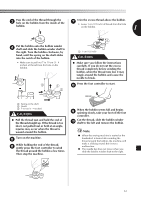
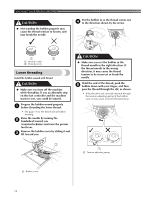
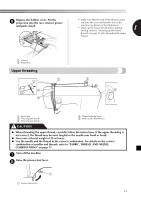
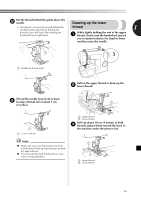
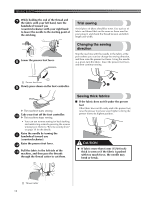
Replace the bobbin cover. Put the 6 projection into the race retainer groove and push closed. 1 2 • Make sure that the end of the thread comes out from the cover toward the rear of the machine (as shown in the illustration). • Draw up the lower thread before starting 1 sewing. Refer to "Drawing up the lower thread" on page 16 after threading the upper thread. 1 Groove 2 Projection Upper threading 2 2 3 4 1 5 1 Spool pin 2 Thread guide (back) 3 Thread guide (front) 4 Thread take-up lever 5 Mark on the handwheel CAUTION ● When threading the upper thread, carefully follow the instructions. If the upper threading is not correct, the thread may become tangled or the needle may bend or break. ● Never use a thread weight of 20 or lower. ● Use the needle and the thread in the correct combination. For details on the correct combination of needles and threads, refer to "FABRIC, THREAD, AND NEEDLE COMBINATIONS" on page 17. Turn off the machine. 1 Raise the presser foot lever. 2 1 1 Presser foot lever 14
-
 1
1 -
2
-
3
-
4
-
5
-
6
-
7
-
8
-
9
-
 10
10 -
 11
11 -
 12
12 -
 13
13 -
 14
14 -
 15
15 -
 16
16 -
 17
17 -
 18
18 -
 19
19 -
 20
20 -
21
-
22
-
23
-
24
-
25
-
26
-
27
-
28
-
29
-
30
-
31
-
32
-
33
-
34
-
35
-
36
-
37
-
38
-
39
-
40
-
41
-
42
-
43
-
44
-
45
-
46
-
47
-
48
-
49
-
50
-
51
-
52
-
53
-
54
-
55
-
56
-
57
-
58
-
59
-
60
-
61
-
62
-
63
-
64
-
65
-
66
-
67
-
68
-
69
-
70
-
71
-
72
-
73
-
74
-
75
-
76
-
77
-
78
-
79
-
80
-
81
-
82
-
83
-
84
-
85
-
86
-
87
-
88
-
89
-
90
-
91
-
92
 |
 |
