Brother International LX2500 Users Manual - English and Spanish - Page 34
Optional Accessories
 |
View all Brother International LX2500 manuals
Add to My Manuals
Save this manual to your list of manuals |
Page 34 highlights
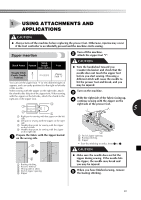
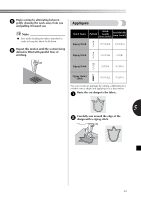
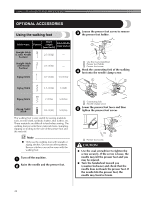
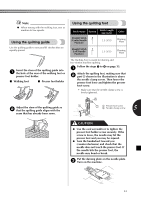
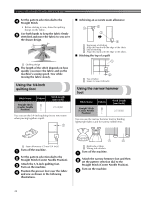
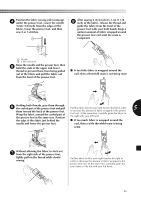
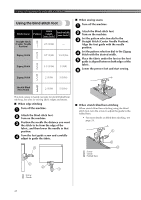
USING ATTACHMENTS AND APPLICATIONS OPTIONAL ACCESSORIES Using the walking foot Loosen the presser foot screw to remove 3 the presser foot holder. Stitch Name Pattern Stitch Length [mm (inch)] Stitch Width [mm (inch)] Straight Stitch 5 (Center Needle 2.5 (3/32) - Position) Straight Stitch 7 (Left Needle 2.5 (3/32) - Position) 8 Zigzag Stitch 0.7 (1/32) 1.5 (1/16) 9 Zigzag Stitch 1.5 (1/16) 3 (1/8) 2 13 1 Use the oval screwdriver 2 Presser foot holder 3 Presser foot screw Hook the connecting fork of the walking 4 foot onto the needle clamp screw. 1 2 10 Zigzag Stitch 2 (1/16) 5 (3/16) Zigzag (Satin) Stitch 11 0.5 (1/32) 5 (3/16) The walking foot is very useful for sewing materials such as vinyl cloth, synthetic leather, thin leather, etc. These materials are difficult to feed when sewing. The walking foot prevents these materials from crumpling, slipping or sticking to the sole of the presser foot and the material. Note ● Only use the walking foot with straight or zigzag stitches. Do not use other patterns. Reverse stitches can not be sewn with the walking foot. Turn off the machine. 1 Raise the needle and the presser foot. 2 1 Connecting fork 2 Needle clamp screw Lower the presser foot lever and then 5 tighten the presser foot screw. 1 1 Presser foot screw CAUTION ● Use the oval screwdriver to tighten the screw securely. If the screw is loose, the needle may hit the presser foot and you may be injured. ● Turn the handwheel toward you (counterclockwise) and check that the needle does not touch the presser foot. If the needle hits the presser foot, the needle may bend or break. 33
-
 1
1 -
2
-
3
-
4
-
5
-
6
-
7
-
8
-
9
-
10
-
11
-
12
-
13
-
14
-
15
-
16
-
17
-
18
-
19
-
20
-
21
-
22
-
23
-
24
-
25
-
26
-
27
-
28
-
 29
29 -
 30
30 -
 31
31 -
 32
32 -
 33
33 -
 34
34 -
 35
35 -
 36
36 -
 37
37 -
 38
38 -
 39
39 -
40
-
41
-
42
-
43
-
44
-
45
-
46
-
47
-
48
-
49
-
50
-
51
-
52
-
53
-
54
-
55
-
56
-
57
-
58
-
59
-
60
-
61
-
62
-
63
-
64
-
65
-
66
-
67
-
68
-
69
-
70
-
71
-
72
-
73
-
74
-
75
-
76
-
77
-
78
-
79
-
80
-
81
-
82
-
83
-
84
-
85
-
86
-
87
-
88
-
89
-
90
-
91
-
92
 |
 |
