Brother International MFC-J4420DW Quick Setup Guide - Page 2
Mobile, Wireless Network - software
 |
View all Brother International MFC-J4420DW manuals
Add to My Manuals
Save this manual to your list of manuals |
Page 2 highlights
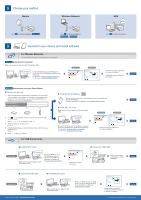
8 Choose your method Mobile Wireless Network USB Go to 9 For Wireless Networks Method B Go to 9 For Wireless Networks Method A or Method B 9 Connect to your device and install software For Wireless Networks To connect additional computers, repeat Method A for each computer. Method A Setup from the computer Make sure that you are logged on with Administrator rights. Download Put the CD-ROM into your CD-ROM drive. If you do not have a CD-ROM drive, download the software at: For Windows®: solutions.brother.com/windows For Macintosh: solutions.brother.com/mac Windows® Macintosh Go to 9 For USB Connections Follow the on-screen instructions to continue installation. A USB cable may be needed in some cases. Finish Method B Manual setup using the Setup Wizard ■■Set up your machine 1. Write your wireless access point/router information in the area below. This information may be hidden on the bottom of the wireless access point/router. If you cannot find it, ask your network administrator or wireless access point/router manufacturer. SSID (Network Name) Network Key (Password) 2. Press on your Brother machine's Touchscreen, and then press Setup Wizard. When Enable WLAN? is displayed, press Yes. 3. Select the SSID you wrote down in 1. Press OK. 4. If the machine prompts you to enter a Network Key, enter the key you wrote down in 1. Press OK. 5. Press Yes to apply your settings. For USB Connections ■■Install Brother iPrint&Scan You can print from and scan to mobile devices using our free application "Brother iPrint&Scan." Download and install the application from solutions.brother.com/ips. ■■Install MFL-Pro Suite Make sure that you are logged on with Administrator rights. Download Windows® Macintosh Put the CD-ROM into your CD-ROM drive. If you do not have a CD-ROM drive, download the software at: For Windows®: solutions.brother.com/windows For Macintosh: solutions.brother.com/mac Follow the on-screen instructions to continue installation. ■■Install MFL-Pro Suite Windows® Download Make sure that you are logged on with Administrator rights. Put the CD-ROM into your CD-ROM drive. If you do not have a CD-ROM drive, download the software at: solutions.brother.com/windows Follow the on-screen instructions. ■■Connect the USB cable Follow the on-screen instructions to continue installation. Finish Finish Finish ■■Connect the USB cable Macintosh Brother support website http://support.brother.com ■■Install MFL-Pro Suite Download Make sure that you are logged on with Administrator rights. Put the CD-ROM into your CD-ROM drive. If you do not have a CD-ROM drive, download the software at: solutions.brother.com/mac Internet access is required. Follow the on-screen instructions to continue installation. Finish © 2014 Brother Industries, Ltd. All rights reserved.
-
 1
1 -
 2
2
 |
 |
