Brother International MFC9440CN Quick Setup Guide - English - Page 22
Firewall settings, Network and Internet Connections - scanning driver
 |
UPC - 012502618300
View all Brother International MFC9440CN manuals
Add to My Manuals
Save this manual to your list of manuals |
Page 22 highlights
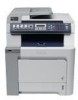
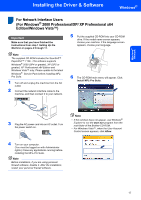
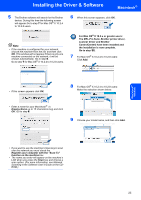
Windows® Network STEP 2 Installing the Driver & Software Windows® Firewall settings Firewall settings on your PC may reject the necessary network connection for Network Scanning and PCFax. If you are using the Windows® Firewall follow the instructions for Windows® XP SP2 or Windows Vista™. If you are using personal firewall software, see the User's Guide for your software or contact the software manufacturer. „ For Windows® XP SP2 users: 1 Click the Start button, Control Panel, Network and Internet Connections and then Windows Firewall. Make sure that Windows Firewall on the General tab is set to On. 2 Click the Advanced tab and Settings... button. 3 Click the Add button. 4 Add port 54925 for network scanning by entering the information below: 1. In Description of service: - Enter any description, for example "Brother Scanner". 2. In Name or IP address (for example 192.168.0.12) of the computer hosting this service on your network: - Enter "Localhost". 3.In External Port Number for this service: Enter "54925". 4.In Internal Port number for this service: Enter "54925". 5.Make sure UDP is selected. 6.Click OK. 6 Add port 54926 for Network PC-Fax by entering the information below: 1. In Description of service: - Enter any description, for example "Brother PC-Fax". 2. In Name or IP address (for example 192.168.0.12) of the computer hosting this service on your network: - Enter "Localhost". 3. In External Port Number for this service: Enter "54926". 4. In Internal Port number for this service: Enter "54926". 5. Make sure UDP is selected. 6. Click OK. 7 If you still have trouble with your network connection, click the Add button. 8 Add port 137 for network scanning, Network PC-Fax receiving and Network printing by entering the information below: 1.In Description of service: - Enter any description, for example "Brother Network Print". 2. In Name or IP address (for example 192.168.0.12) of the computer hosting this service on your network: - Enter "Localhost". 3. In External Port Number for this service: - Enter "137". 4. In Internal Port number for this service: - Enter "137". 5. Make sure UDP is selected. 6.Click OK. 9 Make sure that the new settings are added and checked, and then click OK. 1 2 5 3 4 5 Click the Add button. 20
-
 1
1 -
2
-
3
-
4
-
5
-
6
-
7
-
8
-
9
-
10
-
11
-
12
-
13
-
14
-
15
-
16
-
 17
17 -
 18
18 -
 19
19 -
 20
20 -
 21
21 -
 22
22 -
 23
23 -
 24
24 -
 25
25 -
 26
26 -
 27
27 -
28
-
29
-
30
-
31
-
32
-
33
-
34
 |
 |