Brother International NX-200 Users Manual - English - Page 30
Using thread that winds off quickly, may be damaged.
 |
View all Brother International NX-200 manuals
Add to My Manuals
Save this manual to your list of manuals |
Page 30 highlights
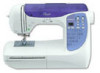
GETTING READY SEWING BASICS UTILITY STITCHES GETTING READY CONTENTS Select a stitch. a • For details on selecting a stitch, refer to "Selecting Stitching" (page 54). • For details on the stitches that can be sewn with the twin needle, refer to "Stitch Settings" (page 92). • Select a stitch width of 5.0 mm (3/16 inch) or less. CAUTION ● When using the twin needle, be sure to select an appropriate stitch, otherwise the needle may break or the machine may be damaged. ● Select a stitch width of 5.0 mm (3/16 inch) or less, otherwise the needle may break or the machine may be damaged. ● After adjusting the stitch width, slowly turn the balance wheel toward you and check that the needle does not touch the presser foot. If the needle hits the presser foot, the needle may bend or break. Start sewing. b • For details on starting to sew, refer to "Starting to sew" (page 39). X Two lines of stitching are sewn parallel to each other. Using thread that winds off quickly When using thread that winds off quickly, such as transparent nylon thread or metallic thread, place the enclosed spool net over the spool before placing the spool of thread onto the spool pin. If the spool net is too long, fold it to fit the size of the spool. 1 2 3 4 1 Spool net 2 Spool 3 Spool cap 4 Spool pin APPENDIX INDEX CAUTION ● When changing the sewing direction, press (needle position button) to raise the needle from the fabric, and then raise the presser foot lever and turn the fabric. 24
-
 1
1 -
2
-
3
-
4
-
5
-
6
-
7
-
8
-
9
-
10
-
11
-
12
-
13
-
14
-
15
-
16
-
17
-
18
-
19
-
20
-
21
-
22
-
23
-
24
-
 25
25 -
 26
26 -
 27
27 -
 28
28 -
 29
29 -
 30
30 -
 31
31 -
 32
32 -
 33
33 -
 34
34 -
 35
35 -
36
-
37
-
38
-
39
-
40
-
41
-
42
-
43
-
44
-
45
-
46
-
47
-
48
-
49
-
50
-
51
-
52
-
53
-
54
-
55
-
56
-
57
-
58
-
59
-
60
-
61
-
62
-
63
-
64
-
65
-
66
-
67
-
68
-
69
-
70
-
71
-
72
-
73
-
74
-
75
-
76
-
77
-
78
-
79
-
80
-
81
-
82
-
83
-
84
-
85
-
86
-
87
-
88
-
89
-
90
-
91
-
92
-
93
-
94
-
95
-
96
-
97
-
98
-
99
-
100
-
101
-
102
-
103
-
104
-
105
-
106
-
107
-
108
-
109
-
110
-
111
 |
 |