Brother International PE-DESIGN 8 Installation Guide - Page 10
Change, Change Current Destination Folder
 |
View all Brother International PE-DESIGN 8 manuals
Add to My Manuals
Save this manual to your list of manuals |
Page 10 highlights
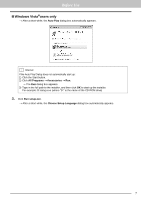
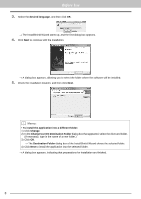
Before Use 3. Select the desired language, and then click OK. → The InstallShield Wizard starts up, and the first dialog box appears. 4. Click Next to continue with the installation. → A dialog box appears, allowing you to select the folder where the software will be installed. 5. Check the installation location, and then click Next. b Memo: • To install the application into a different folder: 1) Click Change. 2) In the Change Current Destination Folder dialog box that appeared, select the drive and folder. (If necessary, type in the name of a new folder.) 3) Click OK. → The Destination Folder dialog box of the InstallShield Wizard shows the selected folder. 4) Click Next to install the application into the selected folder. → A dialog box appears, indicating that preparations for installation are finished. 8
-
 1
1 -
2
-
3
-
4
-
 5
5 -
 6
6 -
 7
7 -
 8
8 -
 9
9 -
 10
10 -
 11
11 -
 12
12 -
 13
13 -
 14
14 -
 15
15 -
16
 |
 |
