Brother International PED-BASIC Users Manual - English - Page 10
Getting Started, Operation screen - software for embroidery
 |
View all Brother International PED-BASIC manuals
Add to My Manuals
Save this manual to your list of manuals |
Page 10 highlights
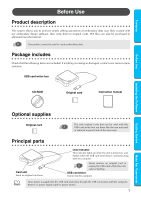
Contents Getting Started Operation screen G G G G G G G G G G G G G G G G G G G G G G G G G G G G G G G G G G G G G G G G G G G CDEF 1 2 3 4 B 5 A Before Use Installing the Software Getting Started 6 7 8 9 0 NO. Name/Button 1 Title bar 2 Menu bar 3 Hoop size selector 4 Browse button () 5 Available patterns list 6 Size display 6 Function This allows you to adjust the size of the window or quit the application. This contains commands for the various functions that you can perform. (See page 10, "Menu Bar Commands") This is used to select the size of the embroidery hoop that can be used with your embroidery machine. (See page 8, "Select the embroidery hoop size.") Do not select a hoop size larger than the embroidery hoop that can be used with your embroidery machine. The created card will not work correctly with the embroidery machine. If you change the hoop size while selecting patterns, remove the patterns that have already been selected. Select the folder where the pattern file (.pes) is saved. (See page 8, "Select the folder.") For details on .pes files, refer to "Product description" on page 1. Images of the pattern files (.pes) saved in the folder selected after clicking displayed here. The name of the file appears below the image. • Patterns that are either too large or have too many stitches for the embroidery hoop size, selected with the "Hoop size selector" (3), are crossed out with a red . • Patterns that are larger than the specified embroidery hoop size are marked with a yellow . The program will automatically reduce the design to fit within the hoop size specified. It may be possible to reduce the design more by using the "Pattern size slider" (7), but, 90% is the lowest it can be reduced. • Patterns created for the optional extra-large embroidery (4) are hoop are marked with the symbol. This displays the size of the pattern selected in the "Available patterns list" (5). • This is available only if one pattern in the Available patterns list (5) is selected. • If the pattern is sized, the new pattern size is displayed here. Menu Bar Commands
-
 1
1 -
2
-
3
-
4
-
 5
5 -
 6
6 -
 7
7 -
 8
8 -
 9
9 -
 10
10 -
 11
11 -
 12
12 -
 13
13 -
 14
14 -
 15
15 -
16
-
17
-
18
-
19
 |
 |
