Brother International PT-3600 Users Manual - English and Spanish - Page 93
To change the TAPE LENGTH ADJUST setting, To change the HEAD ADJUSTMENT setting
 |
UPC - 012502602804
View all Brother International PT-3600 manuals
Add to My Manuals
Save this manual to your list of manuals |
Page 93 highlights
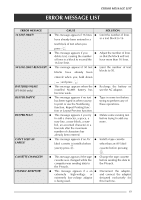
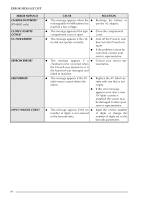
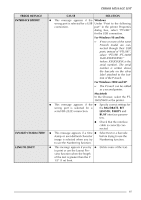
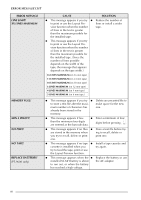
Ch. 4 Machine Adjustments 3 Press m or g until the desired setting is displayed. NOTE To return the function to its default setting (0), press the space bar. 4 Press n to apply the setting. NOTE To apply several Setup settings at the same time, continue pressing j or k to select the function, then pressing m or g to select the desired setting. Press n only after the necessary functions have been set. To change the TAPE LENGTH ADJUST setting: When printing a label with a specified length (Tape Length function), the length of the printed label may be slightly different. This function allows you to adjust the length of the printed label. NOTE If the tape length cannot be adjusted satisfactorily using this function, small adjustments can be made to the tape length using the Tape Length function. 1 Hold down d and press A. NOTE This step may be skipped if settings for several Setup functions are being applied at the same time. 2 Press j or k until TAPE LENGTH ADJUST is displayed. RRRRRRG H I J 1 2N0LMAOU43TT0/O4A00P751E6.007LE8NH9EGLSATIHNBKIACDDJE AUSF T AKUTOQQQQQQQQQQQQ Length Margin Font Width Size 3 Press m or g until the desired setting is displayed. NOTE ☞ To return the function to its default setting (0), press the space bar. ☞ To decrease the label length, select a lower value. To increase the label length, select a higher value. 4 Press n to apply the setting. NOTE To apply several Setup settings at the same time, continue pressing j or k to select the function, then pressing m or g to select the desired setting. Press n only after the necessary functions have been set. To change the HEAD ADJUSTMENT setting: This function allows you to shift the printing up or down within the tape. NOTE This function does not adjust printing on 1 1/2" (36mm)-wide tape. 1 Hold down d and press A. NOTE This step may be skipped if settings for several Setup functions are being applied at the same time. 2 Press j or k until HEAD ADJUSTMENT is displayed. R1 2 3 4 5 6 7 8 9 A B C D E RRRG H RI RJ 05/07 NLMO HEAD 00 ADJUSTMENT AUTO 1.00 HELSINKI A F K QQQQQQQQQQQQ AUTO Length Margin Font Width Size 3 Press m or g until the desired setting is displayed. NOTE ☞ To return the function to its default setting (0), press the space bar. ☞ To shift the printing down, select a lower value. To shift the printing up, select a higher value. 4 Press n to apply the setting. NOTE To apply several Setup settings at the same time, continue pressing j or k to select the function, then pressing m or g to select the desired setting. Press n only after the necessary functions have been set. Machine Adjustments 81
-
 1
1 -
2
-
3
-
4
-
5
-
6
-
7
-
8
-
9
-
10
-
11
-
12
-
13
-
14
-
15
-
16
-
17
-
18
-
19
-
20
-
21
-
22
-
23
-
24
-
25
-
26
-
27
-
28
-
29
-
30
-
31
-
32
-
33
-
34
-
35
-
36
-
37
-
38
-
39
-
40
-
41
-
42
-
43
-
44
-
45
-
46
-
47
-
48
-
49
-
50
-
51
-
52
-
53
-
54
-
55
-
56
-
57
-
58
-
59
-
60
-
61
-
62
-
63
-
64
-
65
-
66
-
67
-
68
-
69
-
70
-
71
-
72
-
73
-
74
-
75
-
76
-
77
-
78
-
79
-
80
-
81
-
82
-
83
-
84
-
85
-
86
-
87
-
 88
88 -
 89
89 -
 90
90 -
 91
91 -
 92
92 -
 93
93 -
 94
94 -
 95
95 -
 96
96 -
 97
97 -
 98
98 -
99
-
100
-
101
-
102
-
103
-
104
-
105
-
106
-
107
-
108
-
109
-
110
-
111
-
112
-
113
-
114
-
115
-
116
-
117
-
118
-
119
-
120
-
121
-
122
-
123
-
124
-
125
-
126
-
127
-
128
-
129
-
130
-
131
-
132
-
133
-
134
-
135
-
136
-
137
-
138
-
139
-
140
-
141
-
142
-
143
-
144
-
145
-
146
-
147
-
148
-
149
-
150
-
151
-
152
-
153
-
154
-
155
-
156
-
157
-
158
-
159
-
160
-
161
-
162
-
163
-
164
-
165
-
166
-
167
-
168
-
169
-
170
-
171
-
172
-
173
-
174
-
175
-
176
-
177
-
178
-
179
-
180
-
181
-
182
-
183
-
184
-
185
-
186
-
187
-
188
-
189
-
190
-
191
-
192
-
193
-
194
-
195
-
196
-
197
-
198
-
199
-
200
-
201
-
202
-
203
-
204
-
205
-
206
-
207
-
208
-
209
-
210
-
211
-
212
 |
 |
