Brother International RJ4030-K RuggedJet w/Bluetooth Battery Quick Reference - Page 1
Brother International RJ4030-K RuggedJet w/Bluetooth Battery Manual
 |
View all Brother International RJ4030-K RuggedJet w/Bluetooth Battery manuals
Add to My Manuals
Save this manual to your list of manuals |
Page 1 highlights
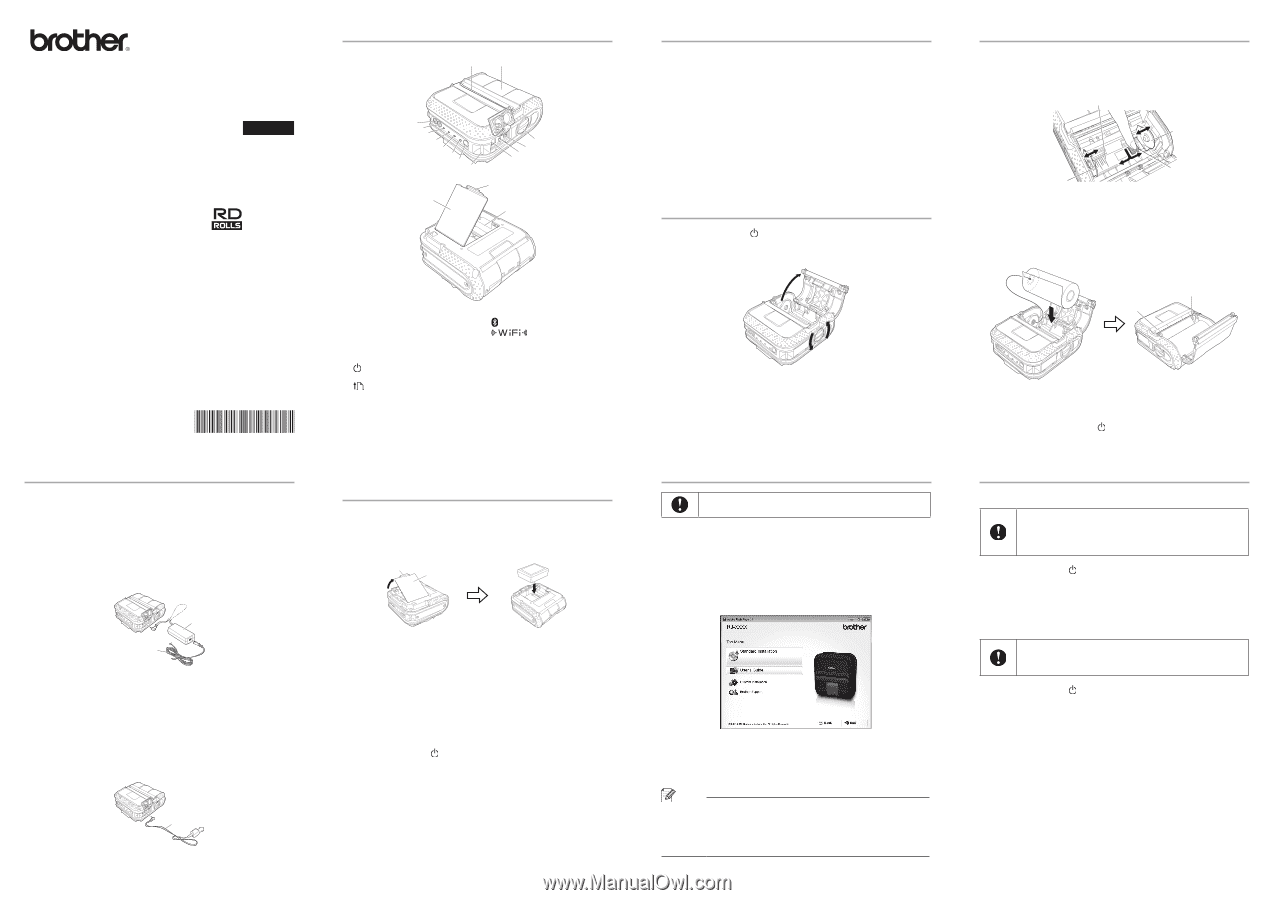
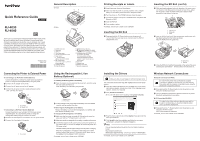
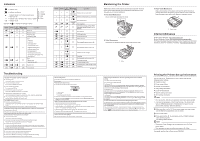
Quick Reference Guide English RJ-4030 RJ-4040 Thank you for purchasing the Brother RJ‑4030/RJ‑4040 mobile printer. Be sure to read the User's Guide (CD‑ROM), Product Safety Guide (Printed), Quick Reference Guide (this manual), Software User's Guide (CD‑ROM) and Network User's Guide (CD‑ROM:RJ‑4040 only) before using the printer. We suggest that you keep these documents in a handy place for future reference. To download the latest manuals, please visit the Brother Solutions Center at (http://solutions.brother.com/), where you can also download the latest drivers and utilities for your printer, read FAQs and troubleshooting tips or learn about special printing solutions. Printed in China LBB473001 Connecting the Printer to External Power „„ Connecting to an AC Power Socket (Optional) Connect the printer to a nearby AC power socket to power the printer or charge the rechargeable battery using AC power. a Connect the AC adapter to the printer. b Connect the AC power cord to the AC adapter. c Connect the AC power cord to a nearby AC power socket (100 - 240 VAC, 50 - 60 Hz). 1 2 1 AC adapter 2 AC power cord „„ Connecting to a DC Power Socket (Optional) Connect the printer to your vehicle's 12 V DC power socket (cigarette lighter, etc.) to power the printer or charge the rechargeable battery using the vehicle's DC power. a Connect the Car adapter to the vehicle's 12 V DC power socket. b Connect the Car adapter to the printer. 3 3 Car adapter General Description „„ Front 6 5 „„ Back 78 9 10 11 12 13 14 15 4 3 2 1 16 17 1 AC/DC connector 2 Serial port 3 USB port 4 Cover open lever 5 RD Roll compartment cover 6 Paper outlet 7 (Power) button (To turn the printer on/off) 8 (Feed) button (To feed the paper or print the printer settings) 9 POWER indicator 10 STATUS indicator 11 BATT (Battery) indicator 12 (Bluetooth) indicator (RJ-4030)/ (Wi-Fi) indicator (RJ-4040) 13 Bluetooth button (RJ-4030)/ Wi-Fi button (RJ-4040) (To communicate with your Bluetooth-equipped computer/ adapter or your network access point/router) 14 Belt hook 15 Battery cover 16 Battery cover latch 17 Battery compartment Using the Rechargeable Li-ion Battery (Optional) „„ Installing the Rechargeable Li-ion Battery a Open the battery cover by pressing the cover latch, and then swing the cover open and remove it. Insert the battery into the battery compartment. 2 1 1 Battery cover 2 Cover latch b Confirm that the hooks on the edge of the battery cover are inserted correctly, and then reattach the cover. „„ Removing the Rechargeable Li-ion Battery Remove the battery cover and the rechargeable Li-ion battery, and then reattach the battery cover. „„ Charging the Rechargeable Li-ion Battery a Make sure that the printer is turned off. If the printer is turned on, press and hold the (Power) button to turn it off. b Make sure that the rechargeable Li-ion battery is installed in the printer. c Use the AC adapter and AC power cord to connect the printer to an AC power socket, or use the Car adapter to connect the printer to a DC power socket. The BATT (battery) indicator light is orange when the printer is charging. When the rechargeable Li-ion battery is fully charged, the BATT (battery) indicator light turns off. Disconnect the AC power cord or Car adapter from the battery's AC/DC connector. For details, see the User's Guide on the CD‑ROM. Printing Receipts or Labels a Install the printer driver and the software. b Make sure that the printer is correctly powered. Use a charged battery or connect the printer to an AC or DC power socket. c Turn the printer on. The POWER indicator should be green. d Connect the printer to a computer or handheld device using either USB, Bluetooth, or Wi-Fi. e Insert the RD Roll. f Print receipts or labels. For details, see the User's Guide on the CD‑ROM. Inserting the RD Roll a Press and hold the (Power) button to turn the printer off. Turn and hold the cover open lever, and then open the RD Roll compartment cover. Installing the Drivers Make sure that you are logged on with Administrator rights. The screenshot shown below may differ slightly from that of the actual product. a Insert the installer CD‑ROM into your CD‑ROM drive. If the model name screen appears, choose your printer. If the language screen appears, choose your language. b Click [Standard Installation]. „„ You can refer to the User's Guide by clicking [User's Guide]. c Read the licence agreement and click [Agree] if you agree with the terms and conditions. d Click [Install] to start the installation and follow the on-screen instructions to complete the Standard Installation. Note You can download optional tools later from the Brother Solutions Center: http://solutions.brother.com [Select your region/country] - Choose your product - [Downloads] For details, see the User's Guide on the CD‑ROM. Inserting the RD Roll (cont'd) b While pushing the adjuster lock in the direction of the arrow, move it to the left or right. Because the roll guide will also move, adjust the roll guide to match the width of the paper using the scale engraved on the inside of the printer. 3 2 1 2 1 Adjuster lock 2 Roll guide 3 Scale c Insert an RD Roll into the RD Roll compartment upside down with the labels feeding from the bottom as shown. Align the RD Roll with the guide lines. 5 4 4 Guide lines 5 Tear bar d Close the RD Roll compartment by pressing on the centre of the cover, and then press and hold the (Power) button to turn the printer on. Wireless Network Connections Bluetooth Connection (RJ‑4030) In order for the printer and your Bluetooth-equipped computer or adapter to communicate, you must first pair the printer with the computer or handheld device using the Bluetooth management software. a Press and hold the (Power) button to turn the printer on, and then press the Bluetooth button. b Use your Bluetooth management software to discover the printer. Bluetooth communication is now active. Wi-Fi Connection (RJ‑4040) In order for the printer and your network access point or router to communicate, you must first install the printer driver and Printer Setting Tool. a Press and hold the (Power) button to turn the printer on, and then press the Wi-Fi button. Wi-Fi communication is now active. For details, see the User's Guide on the CD‑ROM.
-
 1
1 -
 2
2
 |
 |