Brother International Simplicity SB530T Users Manual - English and Spanish - Page 39
Sewing Buttonholes And Buttons
 |
View all Brother International Simplicity SB530T manuals
Add to My Manuals
Save this manual to your list of manuals |
Page 39 highlights
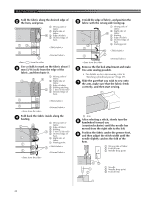
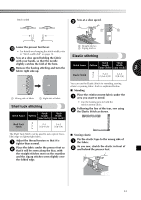
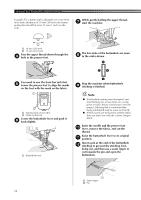
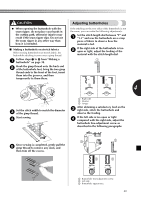
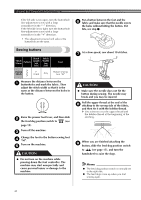
4 SEWING BUTTONHOLES AND BUTTONS CAUTION ● Always turn off the machine before replacing the presser foot. Otherwise, injuries may occur if the foot controller is accidentally pressed and the machine starts sewing. ■ Making a buttonhole Using tailor's chalk, mark the position and 1 length of the buttonhole on the fabric. 2 1 Making a buttonhole (1-step automatic buttonhole) 1 Marks on fabric 2 Buttonhole sewing Stitch Stitch Pattern Length Width Foot Attach the buttonhole foot "A" and set 2 the pattern selection dial to Buttonhole. [mm (inch)] [mm (inch)] Open the button plate and insert the 1 F-1.5 (1/64-1/16) 3-5 (1/8-3/16) (Dial 4-7) Buttonhole foot "A" 3 button. 1 4 Making a buttonhole is a simple process that provides reliable results. With the 1-step Automatic Buttonhole Stitch pattern, a buttonhole is sewn by automatically changing the sewing direction when the buttonhole lever and buttonhole foot are used. Note ● When sewing a stitch pattern other than for a buttonhole, do not lower, touch or move the buttonhole lever, otherwise the stitching may become misaligned or sewn incorrectly. 1 Button plate ■ If the button does not fit in the button guide plate Add together the diameter and thickness of the button, and then set the button guide plate to the calculated length. (The distance between the markings on the presser foot scale is 5 mm (3/16 inch).) Memo ● We recommend that you practice making a buttonhole on a scrap piece of fabric before you try it on an actual garment. ● When making buttonholes on soft fabrics, place a stabilizer material on the underside of the fabric. 1 2 3 1 Presser foot scale 2 Length of buttonhole (Diameter + thickness of button) 3 5 mm (3/16 inch) 38
-
 1
1 -
2
-
3
-
4
-
5
-
6
-
7
-
8
-
9
-
10
-
11
-
12
-
13
-
14
-
15
-
16
-
17
-
18
-
19
-
20
-
21
-
22
-
23
-
24
-
25
-
26
-
27
-
28
-
29
-
30
-
31
-
32
-
33
-
 34
34 -
 35
35 -
 36
36 -
 37
37 -
 38
38 -
 39
39 -
 40
40 -
 41
41 -
 42
42 -
 43
43 -
 44
44 -
45
-
46
-
47
-
48
-
49
-
50
-
51
-
52
-
53
-
54
-
55
-
56
-
57
-
58
-
59
-
60
-
61
-
62
-
63
-
64
-
65
-
66
-
67
-
68
-
69
-
70
-
71
-
72
-
73
-
74
-
75
-
76
-
77
-
78
-
79
-
80
-
81
-
82
-
83
-
84
-
85
-
86
-
87
-
88
-
89
-
90
-
91
-
92
-
93
-
94
-
95
-
96
-
97
-
98
-
99
-
100
-
101
-
102
-
103
-
104
 |
 |
