Brother International XL-6452 Users Manual - English - Page 86
Changing the Light Bulb
 |
View all Brother International XL-6452 manuals
Add to My Manuals
Save this manual to your list of manuals |
Page 86 highlights
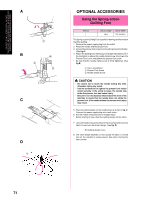
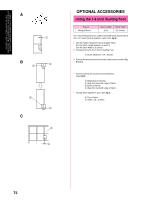
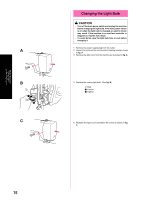
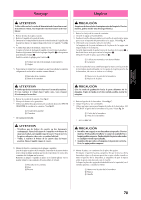
MAINTENANCE ENTRETIEN MANTENIMIENTO A B 1 1 2 C Changing the Light Bulb CAUTION • Turn off the main power switch and unplug the machine before changing the light bulb. If the main power switch is on when the light bulb is changed, an electric shock may result. If the machine is on and foot controller is stepped on, injuries may result. • To avoid burns, give the light bulb time to cool before changing it. 1. Remove the power supply plug from the outlet. 2. Loosen the screw on the reverse side of sewing head as shown in fig. A. 3. Remove the light cover from the machine as illustrated in fig. A. 4. Replace the sewing light bulb. (See fig. B) 1 Bulb 1 Loosen 2 Tighten 5. Reattach the light cover and fasten the screw as shown in fig. C. 75
-
 1
1 -
2
-
3
-
4
-
5
-
6
-
7
-
8
-
9
-
10
-
11
-
12
-
13
-
14
-
15
-
16
-
17
-
18
-
19
-
20
-
21
-
22
-
23
-
24
-
25
-
26
-
27
-
28
-
29
-
30
-
31
-
32
-
33
-
34
-
35
-
36
-
37
-
38
-
39
-
40
-
41
-
42
-
43
-
44
-
45
-
46
-
47
-
48
-
49
-
50
-
51
-
52
-
53
-
54
-
55
-
56
-
57
-
58
-
59
-
60
-
61
-
62
-
63
-
64
-
65
-
66
-
67
-
68
-
69
-
70
-
71
-
72
-
73
-
74
-
75
-
76
-
77
-
78
-
79
-
80
-
 81
81 -
 82
82 -
 83
83 -
 84
84 -
 85
85 -
 86
86 -
 87
87 -
 88
88 -
 89
89 -
 90
90 -
 91
91 -
92
-
93
-
94
-
95
-
96
-
97
-
98
-
99
 |
 |

75
MAINTENANCE
ENTRETIEN
MANTENIMIENTO
Changing the Light Bulb
CAUTION
•
Turn off the main power switch and unplug the machine
before changing the light bulb. If the main power switch
is on when the light bulb is changed, an electric shock
may result. If the machine is on and foot controller is
stepped on, injuries may result.
•
To avoid burns, give the light bulb time to cool before
changing it.
1.
Remove the power supply plug from the outlet.
2.
Loosen the screw on the reverse side of sewing head as shown
in
fig. A
.
3.
Remove the light cover from the machine as illustrated in
fig. A
.
4.
Replace the sewing light bulb. (See
fig. B
)
1
Bulb
1
Loosen
2
Tighten
5.
Reattach the light cover and fasten the screw as shown in
fig.
C
.
A
1
1
2
B
C