Brother International XR-40 Users Manual - English and Spanish - Page 30
Iieurmmiimi, Ilqubffq:31zi:74i
 |
View all Brother International XR-40 manuals
Add to My Manuals
Save this manual to your list of manuals |
Page 30 highlights
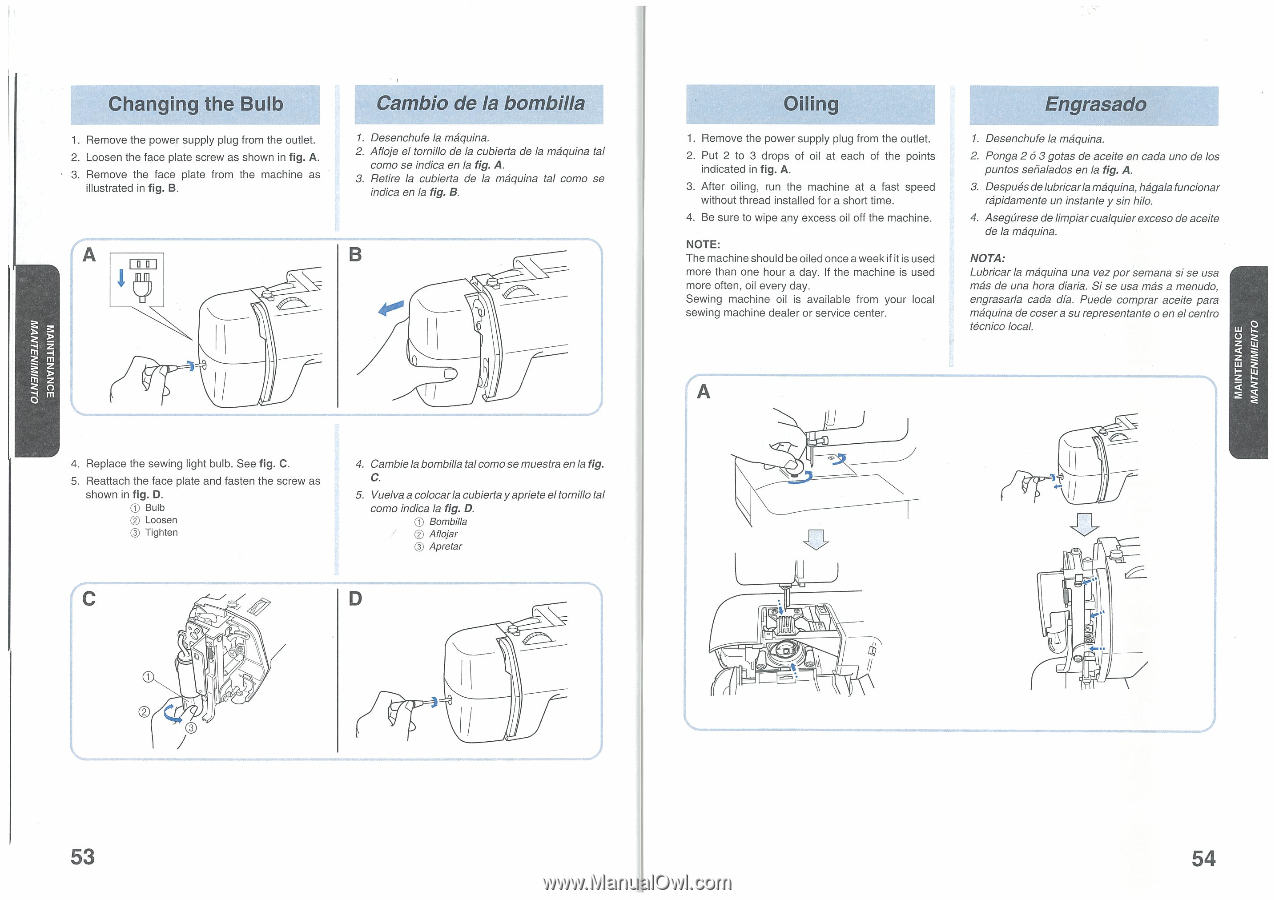
• IIEUrMMIIMI ILQUbffQ:31ZI:74I • Changing the Bulb 1. Remove the power supply plug from the outlet. 2. Loosen the face plate screw as shown in fig. A. • 3. Remove the face plate from the machine as illustrated in fig. B. Cambio de la bombilla 1. Desenchufe la maquina. 2. Afloje el tomillo de la cubierta de la maquina tal como se indica en la fig. A. 3. Retire la cubierta de la maquina tal como se indica en la fig. B. A B -4 ti 4. Replace the sewing light bulb. See fig. C. 5. Reattach the face plate and fasten the screw as shown in fig. D. ® Bulb ® Loosen C) Tighten 4. Cambie la bombilla tal como se muestra en la fig. C. 5. Vuelva a colocarla cubierta yapriete el tomillo tal como indica la fig. D. Bombilla ® Aflojar ® Apretar D tt Oiling 1. Remove the power supply plug from the outlet. 2. Put 2 to 3 drops of oil at each of the points indicated in fig. A. 3. After oiling, run the machine at a fast speed without thread installed for a short time. 4. Be sure to wipe any excess oil off the machine. NOTE: The machine should be oiled once a week if it is used more than one hour a day. If the machine is used more often, oil every day. Sewing machine oil is available from your local sewing machine dealer or service center. Engrasado 1. Desenchufe la maquina. 2. Ponga 2 ó 3 gotas de aceite en cada uno de los puntos setralados en la fig. A. 3. Despues delubricarla maquina, hagala funcionar rapidamente un instante y sin hilo. 4. Asegurese de limpiar cualquier exceso de aceite de la maquina. NOTA: Lubricar la maquina una vez por semana si se usa mas de una hora diaria. Si se usa mas a menudo, engrasarla cada dia. Puede comprar aceite para maquina de coser a su representante o en el centro tecnico local. A it40. 53 54
-
 1
1 -
2
-
3
-
4
-
5
-
6
-
7
-
8
-
9
-
10
-
11
-
12
-
13
-
14
-
15
-
16
-
17
-
18
-
19
-
20
-
21
-
22
-
23
-
24
-
 25
25 -
 26
26 -
 27
27 -
 28
28 -
 29
29 -
 30
30 -
 31
31 -
 32
32 -
 33
33 -
 34
34 -
 35
35
 |
 |