Browning A5 Shotgun Owners Manual
Browning A5 Shotgun Manual
 |
View all Browning A5 Shotgun manuals
Add to My Manuals
Save this manual to your list of manuals |
Browning A5 Shotgun manual content summary:
- Browning A5 Shotgun | Owners Manual - Page 1
A5™ autoloading shotgun owner's manual - Browning A5 Shotgun | Owners Manual - Page 2
9 Nomenclature 10 Serial Number 10 Initial Cleaning 10 Operation of the "Safety 11 Bolt Latch 13 Assembly 13 Disassembly 15 Ammunition 16 Magazine Capacity 17 Three-Shot Adapter (Plug 18 Loading 20 Firing...23 Unloading 24 Interchangeable Choke Tube System 26 Adjusting - Browning A5 Shotgun | Owners Manual - Page 3
W a r n i n g According to state law, California requires that firearm manufacturers, distributors and retailers include conspicuous, specific warnings with firearms sold in that state. and instructions outlined in this owner's manual before using your new guarantee can be made that the firearm - Browning A5 Shotgun | Owners Manual - Page 4
and any persons nearby, as muzzle blast, debris and ejecting shells could inflict serious injury. Always wear eye protection when disassembling and cleaning any firearm to prevent the possibility of springs, spring-tensioned parts, solvents or other agents from contacting your eyes. 5 Keep all - Browning A5 Shotgun | Owners Manual - Page 5
read and heed all warnings in this owner's manual and on ammunition boxes. See pages 16-17 for more information on the correct ammunition for your firearm. 13 USE ONLY SAAMI APPROVED AMMUNITION. The barrel and action of this firearm have been made with substantial safety margins beyond the pressures - Browning A5 Shotgun | Owners Manual - Page 6
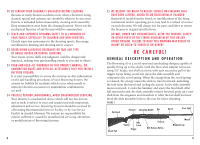
picks up a new shell from the magazine and chambers it. After the last shell has been fired, the slide assembly locks to the rear for faster reloading. F i g ure 1 Buttstock Receiver Operating Handle Rib Barrel Front Sight Recoil Pad Bolt "Safety" Latch Trigger Forearm Bolt Release Button - Browning A5 Shotgun | Owners Manual - Page 7
to disassembly, refer to Figure 2. S e r i a l N u m b e r The serial number of your A5 shotgun is found on the right side of the receiver, below the bolt release button. Record this number in the space provided at the front of this owner's manual for future reference. Initial Cleaning NOTICE - Browning A5 Shotgun | Owners Manual - Page 8
follow this warning could result in ser i ous i n j ury or death . The A5 shotgun is delivered in the box with the barrel removed from the receiver. Assemble the A5 according to the following procedures. 1 Lock the slide assembly rearward by first sliding the bolt latch to the rear, then pulling - Browning A5 Shotgun | Owners Manual - Page 9
to the receiver and forearm when the barrel is not installed on the shotgun. Before assembly, unscrew the magazine cap and remove the forearm retainer. 5 Angle the front of the forearm over the barrel bracket slightly, then push the forearm completely onto the barrel bracket (Figure 7). When the - Browning A5 Shotgun | Owners Manual - Page 10
chamber or at the larger gauge's choke. Your shotgun will misfire (with the chamber appearing to be empty). It is then possible to load the correct gauge shell behind the smaller gauge shell. If the shotgun is then fired, the result will be a so-called "12-16, 12-20, 20-28 or 28-.410 burst" which - Browning A5 Shotgun | Owners Manual - Page 11
be removed. 4 If the barrel and forearm are on the shotgun, hold them to prevent them from falling out of the receiver while pointing the magazine tube down to allow the three-shot adapter (plug) to fall out of the end of the magazine tube. Grasp and remove it (Figure 12). 5 Reinstall the magazine - Browning A5 Shotgun | Owners Manual - Page 12
full capacity by inserting a shell of proper gauge and length through the loading tube. It will make an audible click when fully inserted. THE SHOTGUN IS now READY TO FIRE BY SIMPLY MOVING THE "SAFETY" TO THE OFF SAFE POSITION and pulling the trigger. loading the magazine 1 Lock the slide assembly - Browning A5 Shotgun | Owners Manual - Page 13
2 Close the slide assembly by pressing the bolt release button. 3 Insert a shell of the proper gauge and length through the loading port at the bottom of the receiver up into the magazine, using your thumb to position it fully forward in the magazine tube (Figure 14, page 21). Make certain the rim - Browning A5 Shotgun | Owners Manual - Page 14
j ury or death . 24 ALWAYS INSPECT THE CHAMBER, barrel, feed mechanism and mAGaZINE CAREFULLY AFTER UNLOADING TO BE SURE ALL LIVE shells ARE CLEARED FROM THE firearm. Sp e e d U and Figure 16 magazine to assure there are no shells remaining. 8 Lock the slide assembly rearward by first - Browning A5 Shotgun | Owners Manual - Page 15
INVECTOR or invector-plus Choke TUBES In ANY SHOTGUN BARRELS NOT SUPPLIED BY BROWNING. 26 DO NOT USE ANY OTHER CHOKING DEVICE In ANY SHOTGUN BARREL SUPPLIED BY BROWNING. USE ONLY THE APPROPRIATE GAUGE of INVECTOR-DS Choke TUBE in this shotgun. DO NOT FIRE THIS SHOTGUN WITHOUT the correct - Browning A5 Shotgun | Owners Manual - Page 16
. Several choke tubes are supplied with your shotgun. The choke tubes listed are also available as accessories. Remember, Standard Invector, Invector-Plus and Invector-DS tubes are not interchangeable. Invector-Plus and Invector-DS tubes are for Browning shotguns with back-bored barrels only - Browning A5 Shotgun | Owners Manual - Page 17
shotgun is completely unloaded. Keep the muzzle pointed in a safe direction. Use the choke tube T-Wrench to remove and install the choke tube in the barrel. 2 Before installing a tube, check the choke tube threads in the muzzle, as well as the threads on the choke tube to be sure they are clean - Browning A5 Shotgun | Owners Manual - Page 18
stock. When both screws are free, remove the recoil pad. 2 Add or subtract spacers to fit your firearm to your specifications (Figure 22, page 31). After making an adjustment hold the shotgun to your shoulder to determine if the new the comb approximately 1/16", and the barrel. Angling the stock to - Browning A5 Shotgun | Owners Manual - Page 19
overtighten. 8 Reinstall the stock insert. 9 Reinstall the recoil pad with care, so as not to scratch or mar the finish of the stock. Extra Barrels Before i nstall i n g an accessory b arrel on your shot g un , read the following guidelines to ensure the barrel/shotgun combination is safe - Browning A5 Shotgun | Owners Manual - Page 20
barrel) and the removal of the slide assembly. A complete cleaning requires removal of the slide assembly and trigger group. If a malfunction occurs, perform a thorough cleaning to see if it solves the problem before seeking the services of a Browning Recommended Service Center, the Browning Service - Browning A5 Shotgun | Owners Manual - Page 21
several times. Remove and clean the choke tube and choke tube barrel threads with a nylon brush and lightly oil. Browning offers a complete line of products to make cleaning your firearm fast and easy. Be sure to follow all instructions when using any product to clean your firearm. 4 Inspect the - Browning A5 Shotgun | Owners Manual - Page 22
becomes excessively dirty or wet. If this occurs, disassemble the action for a complete cleaning as explained in the following sections. The slide assembly of your A5 shotgun is designed to be removed in the field, without special tools. Disassembly of the action involves the removal of the slide - Browning A5 Shotgun | Owners Manual - Page 23
and out of the receiver. F i g ure 3 1 Firing Pin Retaining Pin Recoil Spring Slide Assembly Slide Link Firing Pin Spring Firing Pin Bolt Unlocking Pin The slide assembly shown disassembled for cleaning. 2 Remove the barrel and forearm as explained previously. 3 Carefully place the slide - Browning A5 Shotgun | Owners Manual - Page 24
out. Remove the firing pin retaining pin. The firing pin is under spring tension. WEAR EYE PROTECTION WHEN DISASSEMBLING AND CLEANING YOUR shotgun TO PREVENT springs, spring-loaded parts, SOLVENTS OR OTHER AGENTS FROM CONTACTING YOUR EYES, resulting in injury. 3 Insert a small punch into the hole - Browning A5 Shotgun | Owners Manual - Page 25
oil the cavity and wipe it dry. No further disassembly is required for cleaning. 2 Reassemble the trigger group, slide assembly, and the barrel and forearm to the receiver as explained previously, making sure the barrel and action have no cleaning patches inadvertently left in them. Then wipe all - Browning A5 Shotgun | Owners Manual - Page 26
oil. 5 Lightly lubricate the external surface of the action tube. 6 Install the buttstock and recoil pad as explained previously. NOTICE! Do not TAKE YOUR firearm's ACTION APART beyond what is explained in this owner's manual. This is a specialized, f i nely f i tted mechan i sm ; any attempt - Browning A5 Shotgun | Owners Manual - Page 27
, you may send your firearm directly to our Service Department in Arnold, Missouri. Parts listings, Firearm Service Center lists, service procedures, service/ repair form and general product information are also found on the internet at: browning.com. For technical questions about your firearm or - Browning A5 Shotgun | Owners Manual - Page 28
NOTES 52 - Browning A5 Shotgun | Owners Manual - Page 29
browning.com BROWNING US: Morgan, Utah 84050-9326 BROWNING CANADA: Browning Canada Sports Ltd/Ltée, St-Laurent, Quebec, H4S 1W6 BROWNING INTL: Parc Industriel des Hauts-Sarts, B-4040 Herstal, Belgium A01203/11382
-
 1
1 -
 2
2 -
 3
3 -
 4
4 -
 5
5 -
 6
6 -
 7
7 -
8
-
9
-
10
-
11
-
12
-
13
-
14
-
15
-
16
-
17
-
18
-
19
-
20
-
21
-
22
-
23
-
24
-
25
-
26
-
27
-
28
-
29
 |
 |

A5
™
AUTOLOADING SHOTGUN
OWNER’S MANUAL