Browning A5 Shotgun Owners Manual - Page 12
Loading - a 5 shotguns
 |
View all Browning A5 Shotgun manuals
Add to My Manuals
Save this manual to your list of manuals |
Page 12 highlights
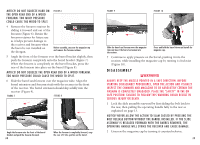
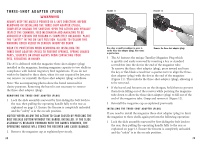
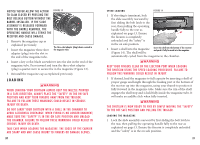
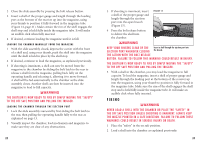
Notice! NEVER ALLOW THE ACTION Figure 13 TO SLAM CLOSED BY PRESSING THE Bolt RELEASE BUTTON WITHOUT THE BARREL INSTALLED. If the slide assem b ly i s released forward w i th the b arrel remo v ed , the operating handle will strike the receiver and cause damage. 2 Remove the magazine cap as explained previously. 3 Insert the magazine three-shot adapter (plug) into the slot in the end of the magazine tube. The three-shot adapter (plug) shown secured in the magazine tube. 4 Insert a key or flat-blade screwdriver into the slot in the end of the magazine tube. Press inward and turn the three-shot adapter (plug) a quarter-turn to secure the in the magazine (Figure 13). 5 Reinstall the magazine cap as explained previously. Loading W hen load i n g your shot g un A lways keep the muzzle po i nted in a safe direction, Always place the "sAFETY" IN THE ON SAFE position and keep your fingers away from the trigger. Fa i lure to follow these warn i n g s could result i n ser i ous injury or death. D o not carry your shot g un w i th a shell i n the cham b er to avoid accidental discharge. when firing is no longer imminent, make sure the "safety" is in the on safe position and unload the chamber. Failure to follow these warnings could result in ser i ous i n j ury or death . take care when loading the magazine. The edges of the carrier are sharp and may cause i n j ury to f i n g ers or dama g e g lo v es . 20 Sp e e d L o a d i n g F i g ure 1 4 1 If shooting is imminent, lock the slide assembly rearward by first sliding the bolt latch to the rear, then pulling the operating handle fully to the rear as explained on page 13. Ensure the firearm is completely unloaded and the "safety" is in the on safe position. 2 Insert a shell into the magazine (Figure 14). The shell will be Insert the shell into the bottom of the receiver and push it fully forward into the magazine. automatically cycled from the magazine to the chamber. Keep your fingers clear of the ejection port when loading the shotgun using the Speed Loading procedure. Failure to follow th i s warn i n g could result i n i n j ury. 3 If desired, load the magazine to full capacity by inserting a shell of proper gauge and length through the loading port at the bottom of the receiver up into the magazine, using your thumb to position it fully forward in the magazine tube. Make sure the rim of the shell engages the shell stop and is held fully inside the magazine tube. It will make an audible click when fully inserted. THE SHOTGUN IS now READY TO FIRE BY SIMPLY MOVING THE "SAFETY" TO THE OFF SAFE POSITION and pulling the trigger. loading the magazine 1 Lock the slide assembly rearward by first sliding the bolt latch to the rear, then pulling the operating handle fully to the rear as explained on page 13. Ensure the firearm is completely unloaded and the "safety" is in the on safe position. 21
-
 1
1 -
2
-
3
-
4
-
5
-
6
-
 7
7 -
 8
8 -
 9
9 -
 10
10 -
 11
11 -
 12
12 -
 13
13 -
 14
14 -
 15
15 -
 16
16 -
 17
17 -
18
-
19
-
20
-
21
-
22
-
23
-
24
-
25
-
26
-
27
-
28
-
29
 |
 |
